Posted By Kepler Lam

Once again, if for some reason you cannot bring up the LITO GUI (like my new laptop running Windows 8 – another garb**** after vista!!!), or if you don’t want to use the GUI. There is another way to connect the H3C simulator to the VPC.
What you need to do is to use the UBridge tools to bridge the LITO and the VPC as shown in the diagram below:


bdg2vpc

You need 2 pairs of UDP port #, 1 pair between LITO and UBridge, the other between VPC and UBridge.
H3C configuration under the “hardcfg.tcl”:

AddEthNew -speed 1000 Level3 -canswitch -slot 0 -subslot 0 -local 127.0.0.1 -lport 19002 -dest 127.0.0.1 -dport 30001

VPC configuration:

VPCS[1]> set lport 20000
VPCS[1]> set rport 30000


While for the UBridge, you need to create 2 legs and put into one group (e.g. use group # 1),


VPC leg: 1#C:E@30000:127.0.0.1:20000
H3C Leg: 1#H:E@30001:10.1.1.3:19002

so execute:


C:\iptools>ubdg.bat 1#H:E@30001:127.0.0.1:19002 1#C:E@30000:127.0.0.1:20000

Now your H3C router should be able to reach the VPC.

- Kepler


Posted By Kepler Lam

Lito is just the GUI front end generating the configuration files for the CEN simulator. If you have difficulty to use it, why bother about it? You can just directly create the router configuration files. Believe me, you can do it in few minutes.
Under your installation folder, you should able to find a folder “TOP”, where you place the configuration files. You need to create subfolders inside, one for each router you want to create. To make it simple, just illustrate how to create 2 routers with a serial link between them. 

2rtr

Create 2 folders with name RT1 and RT2 respectively. Actually you just need 2 files inside each folder.
In subfolder RT1, you need to create a batch file with name “setup.bat” which is used to execute the simulator. Just need one line inside:
"..\..\cen\LITO_cen.exe"

After that, create another file “hardcfg.tcl” with the content below (which is the router’s physical setting):


SetSelfSlot 0
SetMainSlot 0
SetConsoleCom 2001
SetSimwareInstanceName RT1
SetMemorySize 196
SetWinSockOffset 50
SetMac 00 01
SetBrdType 0 8 -slot 4
AddEthNew -speed 1000 Level3 -canswitch -slot 0 -subslot 0 -local 127.0.0.1 -lport 19001 -dest 127.0.0.1 -dport 0
AddEthNew -speed 1000 Level3 -canswitch -slot 0 -subslot 0 -local 127.0.0.1 -lport 19002 -dest 127.0.0.1 -dport 0
AddEthNew -speed 1000 Level3 -canswitch -slot 0 -subslot 0 -local 127.0.0.1 -lport 19003 -dest 127.0.0.1 -dport 0
AddEthNew -speed 1000 Level3 -canswitch -slot 0 -subslot 0 -local 127.0.0.1 -lport 19004 -dest 127.0.0.1 -dport 0
AddSerial  -slot 1 -local 127.0.0.1 -lport 19005 -dest 127.0.0.1 -dport 19013
AddSerial  -slot 1 -local 127.0.0.1 -lport 19006 -dest 127.0.0.1 -dport 0
AddSerial  -slot 1 -local 127.0.0.1 -lport 19007 -dest 127.0.0.1 -dport 0
AddSerial  -slot 1 -local 127.0.0.1 -lport 19008 -dest 127.0.0.1 -dport 0


Some parameters should be unique per router:
SetConsoleCom <telnet port # for console access>
SetSimwareInstanceName <Router name>
SetMac <byte1> <byte2> - I believe for the generation of the pseudo mac address of Ethernet port.
Now you have 4 serial and 4 Ethernet interface to tailor. As in this example, only the first “AddSerial” entry need to be configured. To emulate connection between routers, it just uses an UDP session (like GNS3). What you need are the local UDP port # (this case 19005) and the remote port # (which is 19013).
After that, go to subfolder RT2. Just copy the setup.bat from folder RT1. Create the hardcfg.tcl as below:
SetSelfSlot 0
SetMainSlot 0
SetConsoleCom 2002
SetSimwareInstanceName RT2
SetMemorySize 196
SetWinSockOffset 100
SetMac 00 02
SetBrdType 0 8 -slot 4
AddEthNew -speed 1000 Level3 -canswitch -slot 0 -subslot 0 -local 127.0.0.1 -lport 19009 -dest 127.0.0.1 -dport 0
AddEthNew -speed 1000 Level3 -canswitch -slot 0 -subslot 0 -local 127.0.0.1 -lport 19010 -dest 127.0.0.1 -dport 0
AddEthNew -speed 1000 Level3 -canswitch -slot 0 -subslot 0 -local 127.0.0.1 -lport 19011 -dest 127.0.0.1 -dport 0
AddEthNew -speed 1000 Level3 -canswitch -slot 0 -subslot 0 -local 127.0.0.1 -lport 19012 -dest 127.0.0.1 -dport 0
AddSerial  -slot 1 -local 127.0.0.1 -lport 19013 -dest 127.0.0.1 -dport 19005
AddSerial  -slot 1 -local 127.0.0.1 -lport 19014 -dest 127.0.0.1 -dport 0
AddSerial  -slot 1 -local 127.0.0.1 -lport 19015 -dest 127.0.0.1 -dport 0
AddSerial  -slot 1 -local 127.0.0.1 -lport 19016 -dest 127.0.0.1 -dport 0


Click the setup.bat to start the routers, telnet to port 2001 and 2002 respectively. That’s it. Simple enough?
-Kepler


Posted By Kepler Lam

Here are some short notes on the using of Lito simulator. Especially for those that can't read Chinese.

As unfortunately, the Lito GUI is developed by some Chinese developer. Honestly speaking, even I can read Chinese, as my Windows code page is using the Chinese of Hong Kong, so I still can't read the options of the UI.

Yet, following is the way that I use this simulator (you may have a better way)

After download and unpack the files, in your installation directory, just click the "lito.exe" to enter the GUI. Highlight the arrow icon on the upper menu, then drag a router on the top icon to the work space as shown below:

add_router
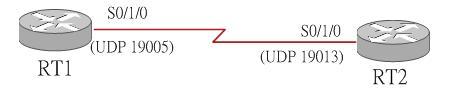
You can add 2 routers. Now connect their serial ports: first select the "connect" icon on top, then right click the first router, you should see a list of interfaces below:


connect_s0


Select e.g. s0/1/0, then drag it across to RT2. Right click RT2 and select e.g. S0/1/0 to complete the connection:

connect_rt2

After that, power on the router: first select back the arrow on the top menu, then right click the router, you will see pull down menu, the first one is the "power on" option.

power_on

Wait for a while, you will see a green dot showing that  the router is running. At the same time, it will generate the configuration of the router. Also power on RT2. Now open a windows explorer to find a folder 'top' under your installation directory. Inside there, 2 folders RT1 and RT2 have been created. Just make a copy of the 'top' folder. (as the UI will delete the folders inside upon exit).

copy_top

Now, you are safe to power off both routers, by right click them, select the first option in the pull down menu:

power_off

Exit the GUI, copy back the subfolders under the "TOP - Copy" back to the "TOP" folder. Then go to the RT1 subfolder inside the top folder. You will find the router configuration filename "hardcfg.tcl", you can open it and explorer some options (will explain in other blog entry).

Finally click the "setup.bat" file to start the router (similar for RT2). Fire a telnet session to port # 2001 to access the RT1 console. Here you go. You don't need the GUI anymore.(Obvious on the top menu, there is a save option and a re-open icon. Unfortunately, I never able to make it work, that's why after generate the configuration of first 2 routers, I just copy the router's folder and change the configuration file to create some more routers)


Hope the above help.

-Kepler


Enlightened by Jesus Christ


Google

User Profile
Kepler Lam
Canada

 
Links
 
Category
 
Archives
 
Visitors

You have 528358 hits.

 
Latest Comments