Archives
You are currently viewing archive for June 2014
Posted By Kepler Lam

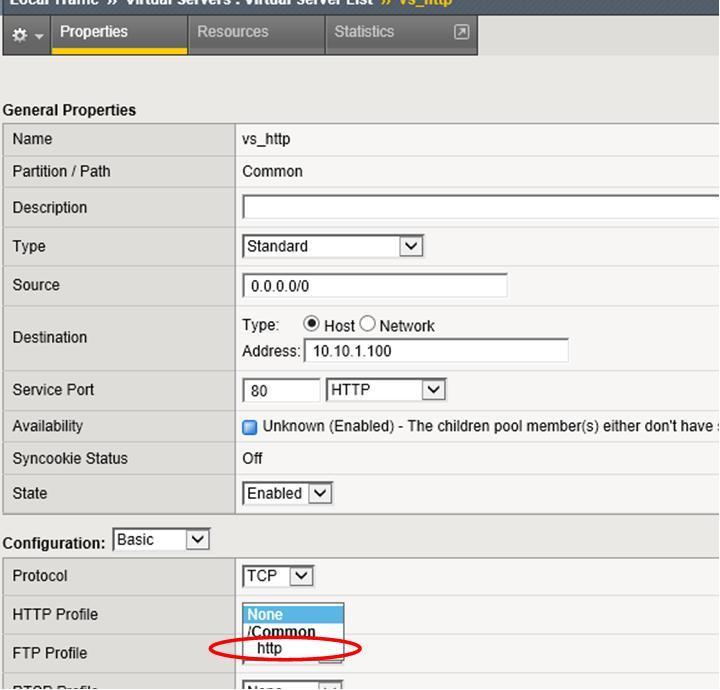
When teaching the F5 admin class last week, there is a lab to use cookie persistence. In order to configure this feature, you need to apply a cookie persistence profile. Yet, most students didn’t realize that there is profile dependence in the F5 configuration.

As this feature is obviously on top of the HTTP protocol which is using the TCP protocol. Under the virtual server configuration, when you select the destination port as port 80, it automatically applies the TCP profile. However, the HTTP profile is not by default selected. So if you directly apply the cookie persistence profile (Local traffic > Virtual Server > Resources) without the HTTP profile, it will produce an error.

ltm_cookie1
But sometimes the error message has been overlooked!

So in order to fix this, you need to go back to the Local traffic > Virtual Server > Properties screen.

Under the HTTP profile, need to select one of the HTTP profile, then update.

ltm_cookie2
 

Then go back to the resources screen, apply the cookie persistence profile.


Posted By Kepler Lam

If you haven't read part 1, click here.

First suspend (or vMotion away) all the VMs running in the ESXi server (if your VSM is running on the ESXi server, remember to save it), put the server to maintenance mode using the vCenter.

maintenance

Now uninstall the existing VEM by the following command:

/~ # esxcli software vib remove -n cisco-vem-v164-esx
Removal Result
   Message: Operation finished successfully.
   Reboot Required: false
   VIBs Installed:
   VIBs Removed: Cisco_bootbank_cisco-vem-v164-esx_4.2.1.2.2.2.0-3.2.1
   VIBs Skipped:

If it doesn’t work for some reason, you may need to reboot your ESXi.

Then install the old VEM.

~ # esxcli software vib install -v /vmfs/volumes/Pod2-DataStore/Cisco_bootbank_cisco-vem-v160-esx_4.2.1.2.2.1.0-3.2.1.vib
Installation Result
   Message: Operation finished successfully.
   Reboot Required: false
   VIBs Installed: Cisco_bootbank_cisco-vem-v160-esx_4.2.1.2.2.1.0-3.2.1
   VIBs Removed:
   VIBs Skipped:

Again, if you are not lucky, it may have some errors or warning, then you may need to reboot your ESXi.

Verify the version and the VEM is running:

~ # vem status

VEM modules are loaded

Switch Name      Num Ports   Used Ports  Configured Ports  MTU     Uplinks
vSwitch0         1536        5           128               1500    vmnic4

VEM Agent (vemdpa) is running

~ # vem version
Running esx version -1623387 x86_64
VEM Version: 4.2.1.2.2.1.0-3.2.1
VSM Version:
System Version: VMware ESXi 5.5.0 Releasebuild-1623387

After that, back to your vCenter and remember to put your ESXi server to exit the maintenance mode. Then resume (or vMotion back) your VMs.


Posted By Kepler Lam

If you are working with the Nexus 1000v, probably you will find that to make sure the version compatibility is a headache.

This blog entry discusses if you have incorrectly installed a newer VEM version which is not compatible with your VSM, then you need to fallback to the old version. The steps are not really so trivial. To upgrade, it is easy. While downgrade is not!

Here I discuss down grade from 4.2.1.2.2.2.0-3.2.1 (fro VSM 4.2.1.SV2.2.2) to 4.2.1.2.2.1.0-3.2.1 (minimal version that support EXSi 5.5 and VSM version 4.2.1.SV2.2.1).
First, verify the existing version:

/vmfs/volumes/98a9ff49-e3284f0c # vem version
Running esx version -1623387 x86_64
VEM Version: 4.2.1.2.2.2.0-3.2.1
VSM Version:
System Version: VMware ESXi 5.5.0 Releasebuild-1623387
/vmfs/volumes/98a9ff49-e3284f0c #  esxcli software vib list | head
Name                           Version                               Vendor  Acceptance Level  Install Date
-----------------------------  ------------------------------------  ------  ----------------  ------------
cisco-vem-v164-esx             4.2.1.2.2.2.0-3.2.1                   Cisco   PartnerSupported  2014-05-15

Try directly installing the old version:

/vmfs/volumes/98a9ff49-e3284f0c # esxcli software vib install -v /vmfs/volumes/Pod2-DataStore/Cisco_bootbank_cisco-vem-v160-esx_4.2.1.2.2.1.0-3.2.1.vib
 [MaintenanceModeError]
 MaintenanceMode is required to remove: [Cisco_bootbank_cisco-vem-v164-esx_4.2.1.2.2.2.0-3.2.1]; install: [].
 Please refer to the log file for more details.

Then try installing with the maintenance mode parameter:

~ # esxcli software vib install -v /vmfs/volumes/Pod2-DataStore/Cisco_bootbank_cisco-vem-v160-esx_4.2.1.2.2.1.0-3.2.1.vib --maintenance-mode

Installation Result
   Message: Operation finished successfully.
   Reboot Required: false
   VIBs Installed: Cisco_bootbank_cisco-vem-v160-esx_4.2.1.2.2.1.0-3.2.1
   VIBs Removed: Cisco_bootbank_cisco-vem-v164-esx_4.2.1.2.2.2.0-3.2.1
   VIBs Skipped:

If you are lucky, you get the above result, then you are done. Unfortunately, for some reason, somtimes the above command won't work. Then you need to use a more complicated aproach. Please follow with my next blog entry.

washington

Taken in my recent trip to deliver the Cisco Nexus 1000v training near the Washington DC area


Google

User Profile
Kepler Lam
Canada

 
Links
 
Category
 
Archives
 
Visitors

You have 528355 hits.

 
Latest Comments