Archives
You are currently viewing archive for August 2015
Posted By Kepler Lam

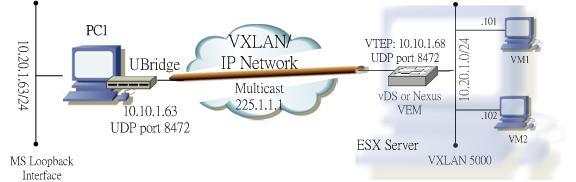
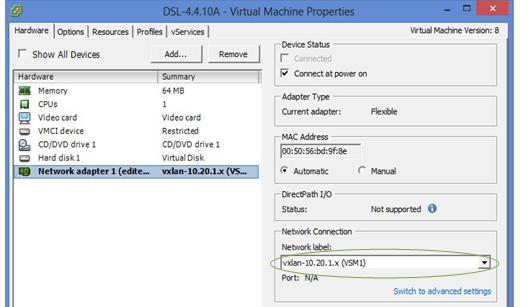
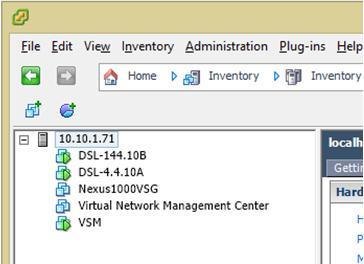
This blog entry explains the detail about the UBridge Tool configuration for bridging to the VXLAN.

As VXLAN is only available in the VM environment, it only allows the VMs inside ESX servers (either the same or different ESX) within the same VXLAN to be able to communicate. Yet, for all other standalone hosts that are not inside ESXi servers cannot directly commuicated with VMs on VXLAN unless using a VXLAN gateway to bridge the VXLAN to traditional VLAN.  

Now by using the Ubridge tool which is freely available inside the IPtools package, you can bridge any interfaces within your Windows PC over the IP network to the VXLAN inside ESX servers.

For example if you have a VMware infrastructure that has a VXLAN with VNID 5000 using multicast group 225.1.1.1.


ubdg_vxlan
 

To bridge your local Windows PC to this VXLAN, your PC will require:

  1. Physical NIC card connected to the IP network that can reach the VTEPs of the other ESX servers using multicast.
  2. Another network interface which can be physical or virtual interface (e.g. you can create a MS loopback interface) that would be used to bridge with the VXLAN.

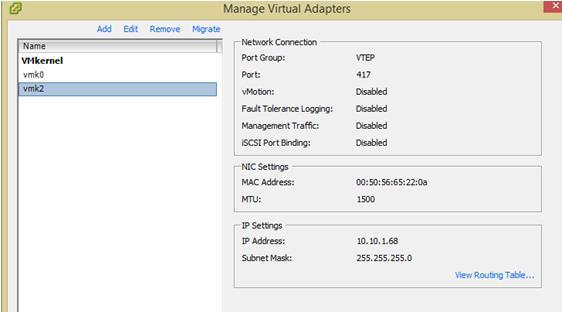
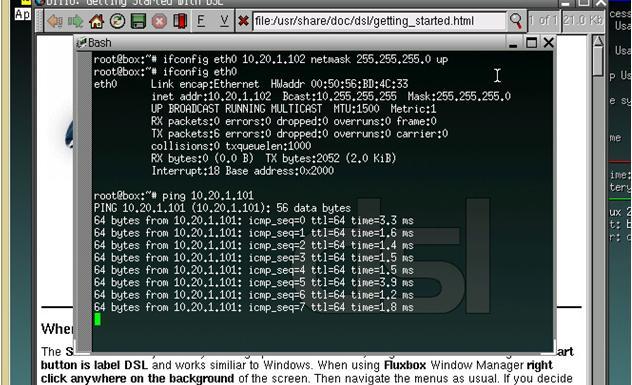
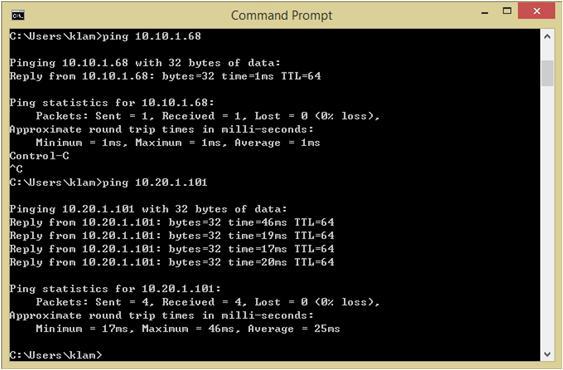
The concept is to create two legs under the group 5000: one leg is your physical NIC that joins the IP network, the other leg is for the interface to be bridged to the VXLAN.

For the physical NIC, find out your local IP address (e.g. 10.10.1.63) that will be the VTEP address. The leg type is VXLAN (V), Ethernet subtype (E), the VNID 5000 and multicast group 225.1.1.1. Syntax of this leg:

5000#V:E@10.10.1.63:225.1.1.1

For the 2nd leg, if you know the Winpcap name of the interface to be bridge, you can specify it as the parameter (most tools such as Wireshark or GNS3 provide a way to find it out). But don't worry, even if you don't have this information, just omit the corresponding parameter, UBrdige will prompt you to choose. This leg type is Winpcap (W), Ethernet subtype (E), E.g. if the name of the loopback interface is \Device\NPF_{5F97CBE5-7D16-48FB-BC77-0E0DE084F049}, then the leg will have the syntax:

5000#W:E@\Device\NPF_{5F97CBE5-7D16-48FB-BC77-0E0DE084F049}

or just use

5000#W:E

Now invoke the UBridge with the above 2 legs:

C:> ubdg 5000#V:E@10.10.1.63:225.1.1.1 5000#W:E@\Device\NPF_{5F97CBE5-7D16-48FB-BC77-0E0DE084F049}

or simply:

C:> ubdg 5000#V:E@10.10.1.63:225.1.1.1 5000#W:E

Now you should able to ping between the loopback interface of the your PC and the VM on the VXLAN inside the ESX server.

- Kepler

Certified Cisco instructor since 1998


Posted By Kepler Lam

To setup the VXLAN in the Nexus 1000v, just follow this Cisco guide.

Configuration steps as follows:

Step 1. Enable the VXLAN Feature

feature segmentation

Note that don’t be confused with the Cisco’s example. Though it just mentions to turn on the segmentation feature, the show feature output also display the network-segmentation feature. So I also turn the later on, that is a MISTAKE! As I find out that if the network-segmentation feature is on, the VEM will never send out multicast packets. It waste me almost a day to figure out the problem.

Step 2. Configure the Default Mode
no segment mode unicast-only

Step 3. Configure the VTEP Port-Profile

For the VTEP VLAN, as I will configure the VTEP address (10.10.1.68) inside the subnet of my local PC, and recall that my ESX’s NIC actually bridge to my local PC, thus I use VLAN 1 (which is the native VLAN).
The VNID (VXLAN ID) to be used is 5000 with multicast group 225.1.1.1 (default Cisco UDP port 8472).

port-profile type vethernet VTEP
  vmware port-group
  switchport mode access
  switchport access vlan 1
  capability vxlan
  no shutdown
  state enabled

Step 4. Create the VTEP VMKernel Interfaces (under vCenter)

VTEP1
VTEP2
Note that in my environment, it requires to "shut" and "no shut" the corresponding VTEP interface in the VSM to make it works.

Step 5. Create the Bridge Domain

bridge-domain 10.20.1..x
  segment id 5000
  group 225.1.1.1

Step 6. Create the VXLAN Port-Profile for VMs
Port-profile type vethernet vxlan-10.20.1.x
  vmware port-group
  switchport mode access
  switchport access bridge-domain 10.20.1.x
  no shutdown
  state enabled

Step 7. Assign the VXLAN Port-Profile to VMs (under vCenter)

The NICs of the 2 different DSL VMs (with IP address 10.20.1.101 and 10.20.1.102 respectively) are changed to use the VXLAN portgroup.

ESX_setup
 

Now I can ping between the 2 different VMs.

ping2

Now to bridge my loopback interface (with IP address 10.20.1.63) of my local PC to the VXLAN, I need to execute the Ubridge tool. (The next blog entry explains more detail about the UBridge configuration). My PC’s local NIC card uses IP address 10.10.1.63 which will be the VTEP address, execute the Ubridge as follow:

c:\> ubdg.bat 5000#W:E 5000#V:E@10.10.1.63:225.1.1.1

Now I can ping between my loopback interface and the 2 VM’s IP address.  

ping1


Posted By Kepler Lam

In this blog entry, I want to discuss how to use the open source tool UBridge to directly bridge the Windows PC to the VXLAN without using any VXLAN gateway.

UBridge is like the vSwitch inside the ESX, but UBridge is open source and can directly execute under the Windows command prompt. It’s now available inside the IPtools package, click here to download.You don’t need to even install it, all you need is to install the Winpcap.

To setup the VXLAN testing environment, you need to have at least one ESX server, vCenter server (while I use the Linux version) and vCenter client software.
I use the Cisco Nexus 1000v to configure the vDS for the VXLAN. Yes, I use Nexus instead of NSX. Honestly, I’m not a VMware guy, I am more familiar with the Cisco technology, also I’ve already have the N1K environment for testing.

The followings are software versions that being used:

  •     ESXi: 5.5.0 (VMkernel release build 1623387)
  •     vCenter: Server Appliance 5.5.0.10000-1624811
  •     VSM:nexus-1000v.4.2.1.SV2.2.2.bin
  •     VEM: Cisco_bootbank_cisco-vem-v160-esx_4.2.1.2.2.2.0-3.2.1.vib

For the minimal hardware requirement, I used VMware workstation in my local PC, and install the ESX as a guest VM, bridge the ESX NIC as my local PC’s NIC. Likewise, the vCenter server is also a guest VM of the VMware workstation.
I created 2 smallest VMs inside the ESX by using the DSL linux image.
Then setup the Nexus 1000v into the VMware infrastructure, which is a long journey and not the focus of this blog, please refer to the corresponding documentation (or can hire me!).
Following figures shows the ESX configuration:

ESX
 

You don't actutally needs the VSG which is for my other testing.

Now, to setup the VXLAN in the Nexus 1000v, please following this next blog entry.


Google

User Profile
Kepler Lam
Canada

 
Links
 
Category
 
Archives
 
Visitors

You have 528354 hits.

 
Latest Comments