|
December 28, 2020 04:35:42
Posted By Kepler Lam
|
|
Here I want to introduce a python script that allow you to remotely access your GNS3 projects by a SSH client (such as putty), only port 22 is required to be externally accessible. Without the GNS3 client installed in your PC, it's difficult to start or stop projects remotely unless you can use remote desktop to login to the hosted Windows machine. Moreover, without knowing the console port number of the devices (unfortunately it changes randomly every time when you load the project), you cannot get the console access of the devices. Think about, if you just setup some labs and want to share with others, but not willing to give the Windows access to the others, currently GNS doesn't provide a ready to use solution. So here, I create a python script which makes use of the REST API provided by the GNS3 to allow the remote access of the projects that have been created in the GNS. Before I discuss how to setup the script, just want to show some of the screens provided by the script. It's very simple to use, just use putty and SSH to the GNS3 VM machine, after login, you will get a intuitive menu. It allows you to load and start different projects and then access the console of different devices of the project:
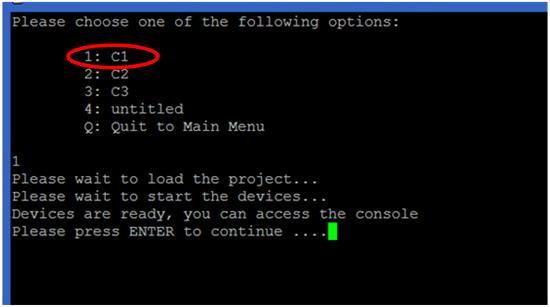
In the main menu, you can start, stop and check the status of the GNS. However, to remotely start the GNS (option 1), you need to setup two more tools: the rmcd provided in the iptools package and the AutoHotkey. As the setup is a bit complicated, I am not going to discuss it here, drop a comment below if anyone interest in it. Otherwise, don't use this option. For option 2, it will display the available projects, just select the project, load and start it. Here are some projects example that I used to deliver the CCNP ROUTE course:
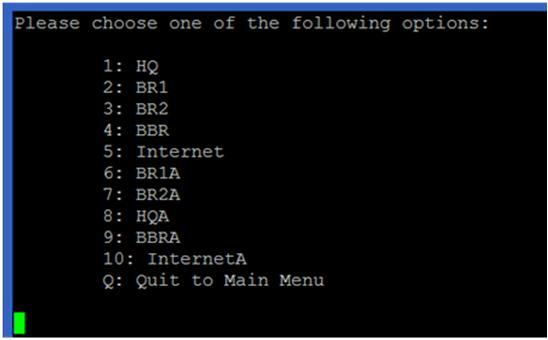
After the project started, press ENTER to go back to main menu. Under option 3 of the main menu, you can access the consoles of different devices of the project (following screen shows the devices in the selected project C1):
You can use Ctrl-] and quit to exit the console. Option 4 of the main menu allows you to power cycle the devices. For option 5 and 6, they are for snapshot management. However, due to the issues of the GNS itself, these options doesn't function very well. Now, I am going to discuss how to setup the script. As the script is written in python, so you can just execute it under any Linux machine that have the python installed. Of course, the most convenient way is to run the script under the GNS3 VM itself. Followings highly the major steps: 1. Configure and verify some GNS3 settings. 2. Download the script and put it under any path. Recommend to put it under /home/gns3. 3. Create a Linux user account and configure the script as the login script of the new account.
Configure and verify some GNS3 settings In fact, the only setting that need to be changed is to uncheck "Protect Server with password (recommended)" setting. You can find it under Edit > Preferences....> Server screen (as below). Well, wait a minute... I know you may concern the security issue for uncheck this option. If you want to enable it, you may need to change the python script to handle the HTTP authentication which is not currently implemented. As in my environment, GNS3 is only used for testing or lab purpose, so should be under a restricted network. I believe it's not supposed to be used in production environment, if so, you should handle the security issue by yourself.
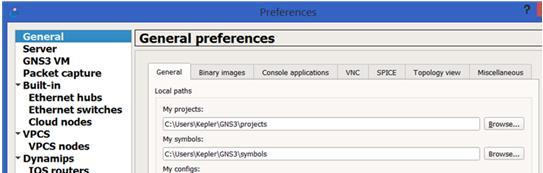
Another setting that you may want to check is under General > General tab, just verify your project path. You should put all the projects under the "My projects" path, as the python script will locate the projects under there.
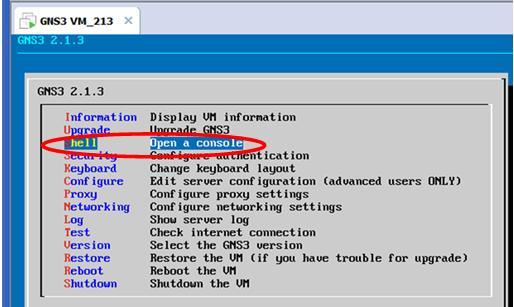
Download the script and put it under any desirable path You can find the script under https://github.com/keplerlam/gns3remote/blob/main/gns_admin.py Download the script, edit the script, near the end of the script, change the following: GNS_HOST="192.168.1.1" # Change the IP address to the machine host the GNS client Then put it under the GNS VM. You can use the GNS VM console, start a command line (as shown below):
Under the Linux command prompt, you can use ftp or scp to copy the script from the file server (of course you need a FTP or SFTP server and download the script under the server first). If you don't have the file server, maybe you can just copy and paste the script using the editor. It seems the only available editor under the GNS VM is nano. So under the Linux prompt: gns3@gns3-iouvm:~$ nano gns_admin.py Then paste the script content and save the file. After that, you need to change the execution mode of the script: gns3@gns3-iouvm:~$ chmod a+x gns_admin.py
Create a Linux user account and configure the script as the login script of the new account Actually, you can test the script right now: gns3@gns3-iouvm:~$ ./gns_admin.py But most likely, you want to use another Linux user account and automatically run the script once login. You can use the adduser command, below is an example for adding an user tester: gns3@gns3-iouvm:~$ sudo adduser tester sudo: unable to resolve host gns3-iouvm Adding user `tester' ... Adding new group `tester' (1002) ... Adding new user `tester' (1002) with group `tester' ... Creating home directory `/home/tester' ... Copying files from `/etc/skel' ... Enter new UNIX password: Retype new UNIX password: passwd: password updated successfully Changing the user information for tester Enter the new value, or press ENTER for the default Full Name []: Tester Room Number []: Work Phone []: Home Phone []: Other []: Is the information correct? [Y/n] y The last step is to configure the script to be automatically run when login to the newly created user tester by following command : gns3@gns3-iouvm:~$ sudo chsh tester sudo: unable to resolve host gns3-iouvm Changing the login shell for tester Enter the new value, or press ENTER for the default Login Shell [/bin/bash]: /home/gns3/gns_admin.py Now open a ssh session and login to the user tester to fire the script. |
|
|


Home |
klam_Blog |
Terms & Conditions |
Administrator Sign In
|
RSS 
All blog contents are provided by website administrator. All other trademarks and copyrights are the property of their respective holders.
Copyright © 2026. Doteasy Technology Inc. All Rights Reserved. Blog software owned and powered by Doteasy Web Hosting.
All blog contents are provided by website administrator. All other trademarks and copyrights are the property of their respective holders.
Copyright © 2026. Doteasy Technology Inc. All Rights Reserved. Blog software owned and powered by Doteasy Web Hosting.