|
April 3, 2019 07:40:22
Posted By Kepler Lam
|
To complete the discussion of the whole demostration. This last part disccus another supporting Python script nxapi_utils.py come from Cisco, it provides the ExecuteiAPICommand function call to connect to the Nexus box and execute the command. It just return the XML as "text", then the text can be passed into minidom.parseString which parses the fields and arrange the information into a python XML class (with hierarchy).
To get back the value of a particular field, there are 2 methods:
1. Use the GetNodeDataDom by passing the XML and the field name as the parameters.
2. or use the XML class method getElementsByTagName
Here is the script:
#!/usr/bin/env python
#
# tested with build n9000-dk9.6.1.2.I1.1.510.bin
#
# Copyright (C) 2013 Cisco Systems Inc.
#
# Licensed under the Apache License, Version 2.0 (the "License");
# you may not use this file except in compliance with the License.
# You may obtain a copy of the License at
#
# http://www.apache.org/licenses/LICENSE-2.0
#
# Unless required by applicable law or agreed to in writing, software
# distributed under the License is distributed on an "AS IS" BASIS,
# WITHOUT WARRANTIES OR CONDITIONS OF ANY KIND, either express or implied.
# See the License for the specific language governing permissions and
# limitations under the License.
import requests
def GetiAPICookie(url, username, password):
xml_string="<?xml version=\"1.0\" encoding=\"ISO-8859-1\"?> \
<ins_api> \
<version>0.1</version> \
<type>cli_show</type> \
<chunk>0</chunk> \
<sid>session1</sid> \
<input>show clock</input> \
<output_format>xml</output_format>\
</ins_api>"
try:
r = requests.post(url, data=xml_string, auth=(username, password))
except requests.exceptions.ConnectionError as e:
print "Connection Error"
else:
return r.headers['Set-Cookie']
def ExecuteiAPICommand(url, cookie, username, password, cmd_type, cmd):
headers = {'Cookie': cookie}
xml_string="<?xml version=\"1.0\" encoding=\"ISO-8859-1\"?> \
<ins_api> \
<version>0.1</version> \
<type>" + cmd_type + "</type> \
<chunk>0</chunk> \
<sid>session1</sid> \
<input>" + cmd + "</input> \
<output_format>xml</output_format> \
</ins_api>"
try:
r = requests.post(url, headers=headers, data=xml_string, auth=(username, password))
except requests.exceptions.ConnectionError as e:
print "Connection Error"
else:
return r.text
def GetNodeDataDom(dom,nodename):
# given a XML document, find an element by name and return it as a string
try:
node=dom.getElementsByTagName(nodename)
return (NodeAsText(node))
except IndexError:
return "__notFound__"
def NodeAsText(node):
# convert a XML element to a string
try:
nodetext=node[0].firstChild.data.strip()
return nodetext
except IndexError:
return "__na__"
The challenge of the script is the requirement to know the structure of the returned XML and the corresponding field names. This can be easily solved by using the NX-API Developer Sandbox.
|
|
April 3, 2019 07:10:22
Posted By Kepler Lam
|
Second part of intf.py:
def show_interfaces(IP):
form_str="""
<form action="/cgi-bin/WebMgr.py" method="post">
Switch IP Address List: <input type="text" name="IP" value=%s>
<input type="submit" value="Show">
</form>
"""%IP_STRING
if intf:
print "<h2>Nexus Web Manager - Show Interface</h2>"
print form_str
print """
<table>
<tr>
<th>Interface</th>
<th>Description</th>
<th>HW Addr</th>
<th>Speed</th>
<th>In Bytes</th>
<th>Out Bytes</th>
<th>Duplex</th>
</tr>
<tr>
"""
else:
print "<h2>Nexus Web Manager - Interface Management</h2>"
print form_str
print """
<table>
<tr>
<th>Interface</th>
<th>State</th>
<th>Vlan</th>
<th>Port Mode</th>
<th>Show Interfaces</th>
</tr>
<tr>
"""
url = 'http://'+IP+'/ins/'
cookie=GetiAPICookie(url, user, password)
if intf:
dom = minidom.parseString(ExecuteiAPICommand(url, cookie, user, password, "cli_show", "show interface %s"%intf))
intfdict=getIntf(dom)
dom = minidom.parseString(ExecuteiAPICommand(url, cookie, user, password, "cli_show_ascii", "show run interface %s"%intf))
run_cfg = NodeAsText(dom.getElementsByTagName("body"))
else:
dom = minidom.parseString(ExecuteiAPICommand(url, cookie, user, password, "cli_show", "show interface"))
intfdict=getIntf(dom)
dom = minidom.parseString(ExecuteiAPICommand(url, cookie, user, password, "cli_show", "show interface switchport"))
intfdict=getSwitchport(dom,intfdict)
for interface in intfdict.keys():
print "<tr>"
if intf:
print("<td>%s </td>" % (interface))
print("<td>%s </td>" % (intfdict[interface]['desc']))
print("<td>%s </td>" % (intfdict[interface]['HWaddr']))
print("<td>%s </td>" % (intfdict[interface]['speed']))
print("<td>%s </td>" % (intfdict[interface]['inbytes']))
print("<td>%s </td>" % (intfdict[interface]['outbytes']))
print("<td>%s </td>" % (intfdict[interface]['duplex']))
else:
print("<td>%s </td>" % (interface))
print("<td>%s </td>" % (intfdict[interface]['state']))
print("<td>%s </td>" % (intfdict[interface]['access_vlan']))
print("<td>%s </td>" % (intfdict[interface]['mode']))
form_str="""<td>
<form action="/cgi-bin/Intf.py" method="post">
<input type="hidden" name="Intf" value=%s>
<input type="hidden" name="IP_LIST" value=%s>
<input type="hidden" name="IP" value=%s>
<input type="submit" value="Show">
</form>
</td>
"""%(interface,IP_STRING,IP)
print form_str
print("</tr>")
return run_cfg
#################
# MAIN MODULE #
#################
# First things first: credentials. They should be parsed through sys.argv[] ideally ..
form = cgi.FieldStorage()
# Get data from fields
IP = form.getvalue('IP')
IP_STRING = form.getvalue('IP_LIST')
intf = form.getvalue('Intf')
user="admin"
password="dummy"
print("Content-type:text/html")
print """
<head>
<style>
table {
font-family: arial, sans-serif;
border-collapse: collapse;
width: 100%;
}
td, th {
border: 1px solid #dddddd;
text-align: left;
padding: 8px;
}
</style>
</head>
<body>
"""
run_cfg=show_interfaces(IP)
if intf:
print "<table><tr><td>"
print run_cfg.replace("\n","<br />\n")
print "</table>"
print "</table>"
Thus actually, depending on whether the interface name is passed to Intf.py script or not, the flow is a bit different. When it gets the interface name, it calls "show interface interface_name" and "show run interface interface_name " to get the detail and display the information.
Click here to continue to the last part.
|
|
April 3, 2019 07:00:22
Posted By Kepler Lam
|
Thus actually, depending on whether the interface name is passed to Intf.py script or not, the flow is a bit different. When it gets the interface name, it calls "show interface interface_name" and "show run interface interface_name " to get the detail and display the information.

Here is the intf.py (as its too long, I will break it down into another blog):
#!/usr/bin/env python
#
import cgi, cgitb
from xml.dom import minidom
from nxapi_utils import *
def getIntf(xml):
interfaces = xml.getElementsByTagName("ROW_interface")
# build a dictionary of interface with key = interface
# the format of the dictionary is as follows:
intfdict = {}
for interface in interfaces:
intfname = NodeAsText(interface.getElementsByTagName("interface"))
intfstate = NodeAsText(interface.getElementsByTagName("state"))
intfdesc = NodeAsText(interface.getElementsByTagName("desc"))
intfhwaddr = NodeAsText(interface.getElementsByTagName("eth_hw_addr"))
intfspeed = NodeAsText(interface.getElementsByTagName("eth_speed"))
intfduplex = NodeAsText(interface.getElementsByTagName("eth_duplex"))
intfinbytes = NodeAsText(interface.getElementsByTagName("eth_inbytes"))
intfoutbytes = NodeAsText(interface.getElementsByTagName("eth_outbytes"))
intfdict[intfname]={'state': intfstate, \
'desc': intfdesc, \
'access_vlan': "N/A", \
'mode': "L3", \
'speed': intfspeed, \
'duplex': intfduplex, \
'inbytes': intfinbytes, \
'outbytes': intfoutbytes, \
'HWaddr': intfhwaddr}
return intfdict
def getSwitchport(xml,intfdict):
interfaces = xml.getElementsByTagName("ROW_interface")
# build a dictionary of interface with key = interface
# the format of the dictionary is as follows:
# neighbors = {'intf': {neighbor: 'foo', remoteport: 'x/y', model: 'bar'}}
for interface in interfaces:
intfname = NodeAsText(interface.getElementsByTagName("interface"))
intfswitchport = NodeAsText(interface.getElementsByTagName("switchport"))
intfvlan = NodeAsText(interface.getElementsByTagName("access_vlan"))
intfmode = NodeAsText(interface.getElementsByTagName("oper_mode"))
intfdict[intfname]['switchport']= intfswitchport
intfdict[intfname]['access_vlan']= intfvlan
intfdict[intfname]['mode']= intfmode
return intfdict
Click here to continue.
|
|
April 3, 2019 05:47:23
Posted By Kepler Lam
|
In the NX-OS 9K training, I created a sample Webportal (by modifying some code from Github) to demonstrate the usage of the NX-API, here I want to share it.
The purpose of the Webportal is just allow an user enter a list of Nexus 9K Management IP, then it display some version information of them. The user can then select one of the 9K to view the interfaces' information. Finally, can select the interface to view more detail.
The portal is quite straight forward. The first screen just a pure form to prompt user to enter the list of IP addresses. The form action will then call the python script WebMgr.py to process the form data (which is just the list of IP addresses).

Here's the HTML:
<h2>Nexus Web Manager</h2>
<form action="/cgi-bin/WebMgr.py" method="post">
Switch IP Address List: <input type="text" name="IP">
<input type="submit" value="Show">
</form>
The WebMgr.py python script get back the form data by form.getvalue('IP'), then connect to each of the IP address (username and password is HARD CODED inside the script, as an exercise, reader can modify the form to prompt user to enter them), use the Nexus API to do a "show version" and parse some of the information, then display them one by one in a table. Moreover, on the last table column, create a form button with action to call Intf.py by passing the corresponding Nexus 9K management IP to it.

Here is the WebMgr.py:
#!/usr/bin/env python
#
import cgi, cgitb
from xml.dom import minidom
from nxapi_utils import *
#################
# MAIN MODULE #
#################
# First things first: credentials. They should be parsed through sys.argv[] ideally ..
form = cgi.FieldStorage()
# Get data from fields
IP_STRING = form.getvalue('IP')
IP_LIST=IP_STRING.split(",")
user="admin"
password="dummy"
print("Content-type:text/html")
print """
<head>
<style>
table {
font-family: arial, sans-serif;
border-collapse: collapse;
width: 100%%;
}
td, th {
border: 1px solid #dddddd;
text-align: left;
padding: 8px;
}
</style>
</head>
<body>
<h2>Nexus Web Manager</h2>
<form action="/cgi-bin/WebMgr.py" method="post">
Switch IP Address List: <input type="text" name="IP" value=%s>
<input type="submit" value="Show">
</form>
<table>
<tr>
<th>IP Address</th>
<th>Hostname</th>
<th>Version</th>
<th>Show Interfaces</th>
</tr>
<tr>
"""%format(IP_STRING)
for IP in IP_LIST:
url = 'http://'+IP+'/ins/'
cookie=GetiAPICookie(url, user, password)
dom = minidom.parseString(ExecuteiAPICommand(url, cookie, user, password, "cli_show", "show version"))
host_name=GetNodeDataDom(dom,"host_name")
kickstart_ver_str=GetNodeDataDom(dom,"kickstart_ver_str")
print "<tr>"
print("<td>%s </td>" % (IP))
print("<td>%s </td>" % (host_name))
print("<td>%s </td>" % (kickstart_ver_str))
form_str="""<td>
<form action="/cgi-bin/Intf.py" method="post">
<input type="hidden" name="IP_LIST" value=%s>
<input type="hidden" name="IP" value=%s>
<input type="submit" value="Manager">
</form>
</td>
"""%(IP_STRING,IP)
print form_str
print("</tr>")
print "</table>"
Inside the Intf.py script, just like the WebMgr.py, after getting back the form data (IP address), it uses the Nexus API to do a "show interface" and "show interface switchport" commands, to get information such as the status, VLAN about the interfaces. Again, just display as a table, and in the last column, also create a form button to display the detail of that interface. This time the form action calls back the Intf.py script with an additional information which is the interface name.

Please follow this link to continue with next part.
|
|
August 24, 2015 07:53:48
Posted By Kepler Lam
|
This blog entry explains the detail about the UBridge Tool configuration for bridging to the VXLAN.
As VXLAN is only available in the VM environment, it only allows the VMs inside ESX servers (either the same or different ESX) within the same VXLAN to be able to communicate. Yet, for all other standalone hosts that are not inside ESXi servers cannot directly commuicated with VMs on VXLAN unless using a VXLAN gateway to bridge the VXLAN to traditional VLAN.
Now by using the Ubridge tool which is freely available inside the IPtools package, you can bridge any interfaces within your Windows PC over the IP network to the VXLAN inside ESX servers.
For example if you have a VMware infrastructure that has a VXLAN with VNID 5000 using multicast group 225.1.1.1.
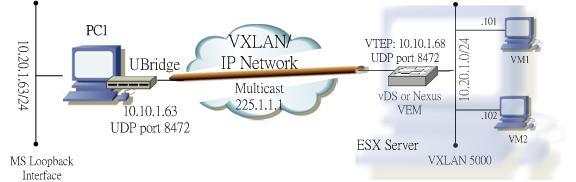
To bridge your local Windows PC to this VXLAN, your PC will require:
- Physical NIC card connected to the IP network that can reach the VTEPs of the other ESX servers using multicast.
- Another network interface which can be physical or virtual interface (e.g. you can create a MS loopback interface) that would be used to bridge with the VXLAN.
The concept is to create two legs under the group 5000: one leg is your physical NIC that joins the IP network, the other leg is for the interface to be bridged to the VXLAN.
For the physical NIC, find out your local IP address (e.g. 10.10.1.63) that will be the VTEP address. The leg type is VXLAN (V), Ethernet subtype (E), the VNID 5000 and multicast group 225.1.1.1. Syntax of this leg:
5000#V:E@10.10.1.63:225.1.1.1
For the 2nd leg, if you know the Winpcap name of the interface to be bridge, you can specify it as the parameter (most tools such as Wireshark or GNS3 provide a way to find it out). But don't worry, even if you don't have this information, just omit the corresponding parameter, UBrdige will prompt you to choose. This leg type is Winpcap (W), Ethernet subtype (E), E.g. if the name of the loopback interface is \Device\NPF_{5F97CBE5-7D16-48FB-BC77-0E0DE084F049}, then the leg will have the syntax:
5000#W:E@\Device\NPF_{5F97CBE5-7D16-48FB-BC77-0E0DE084F049}
or just use
5000#W:E
Now invoke the UBridge with the above 2 legs:
C:> ubdg 5000#V:E@10.10.1.63:225.1.1.1 5000#W:E@\Device\NPF_{5F97CBE5-7D16-48FB-BC77-0E0DE084F049}
or simply:
C:> ubdg 5000#V:E@10.10.1.63:225.1.1.1 5000#W:E
Now you should able to ping between the loopback interface of the your PC and the VM on the VXLAN inside the ESX server.
- Kepler
Certified Cisco instructor since 1998
|
|
August 24, 2015 07:13:09
Posted By Kepler Lam
|
To setup the VXLAN in the Nexus 1000v, just follow this Cisco guide.
Configuration steps as follows:
Step 1. Enable the VXLAN Feature
feature segmentation
Note that don’t be confused with the Cisco’s example. Though it just mentions to turn on the segmentation feature, the show feature output also display the network-segmentation feature. So I also turn the later on, that is a MISTAKE! As I find out that if the network-segmentation feature is on, the VEM will never send out multicast packets. It waste me almost a day to figure out the problem.
Step 2. Configure the Default Mode
no segment mode unicast-only
Step 3. Configure the VTEP Port-Profile
For the VTEP VLAN, as I will configure the VTEP address (10.10.1.68) inside the subnet of my local PC, and recall that my ESX’s NIC actually bridge to my local PC, thus I use VLAN 1 (which is the native VLAN).
The VNID (VXLAN ID) to be used is 5000 with multicast group 225.1.1.1 (default Cisco UDP port 8472).
port-profile type vethernet VTEP
vmware port-group
switchport mode access
switchport access vlan 1
capability vxlan
no shutdown
state enabled
Step 4. Create the VTEP VMKernel Interfaces (under vCenter)

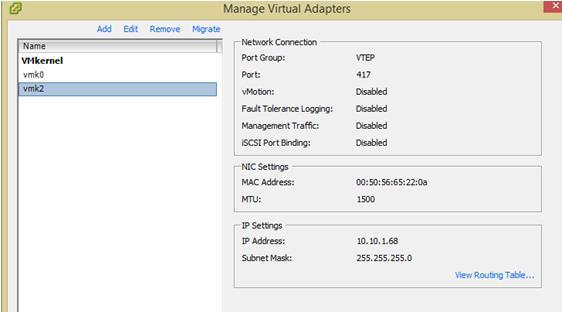
Note that in my environment, it requires to "shut" and "no shut" the corresponding VTEP interface in the VSM to make it works.
Step 5. Create the Bridge Domain
bridge-domain 10.20.1..x
segment id 5000
group 225.1.1.1
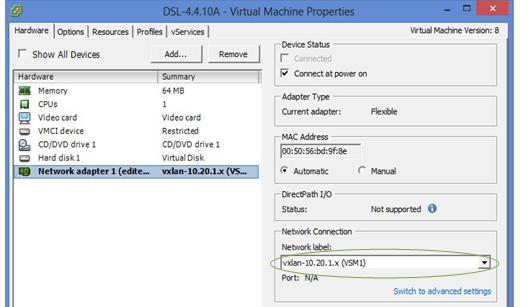
Step 6. Create the VXLAN Port-Profile for VMs
Port-profile type vethernet vxlan-10.20.1.x
vmware port-group
switchport mode access
switchport access bridge-domain 10.20.1.x
no shutdown
state enabled
Step 7. Assign the VXLAN Port-Profile to VMs (under vCenter)
The NICs of the 2 different DSL VMs (with IP address 10.20.1.101 and 10.20.1.102 respectively) are changed to use the VXLAN portgroup.
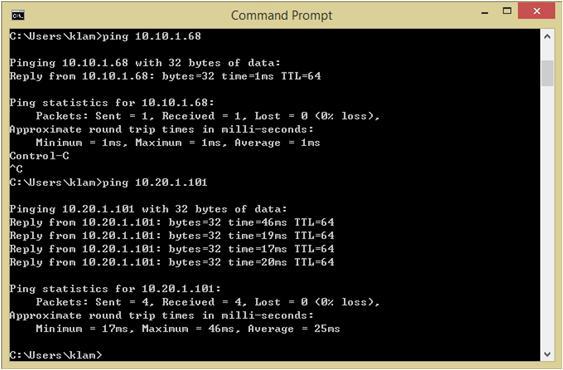
Now I can ping between the 2 different VMs.
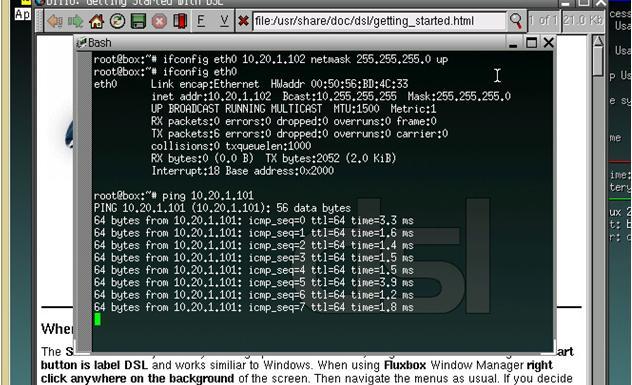
Now to bridge my loopback interface (with IP address 10.20.1.63) of my local PC to the VXLAN, I need to execute the Ubridge tool. (The next blog entry explains more detail about the UBridge configuration). My PC’s local NIC card uses IP address 10.10.1.63 which will be the VTEP address, execute the Ubridge as follow:
c:\> ubdg.bat 5000#W:E 5000#V:E@10.10.1.63:225.1.1.1
Now I can ping between my loopback interface and the 2 VM’s IP address.
|
|
August 24, 2015 06:08:22
Posted By Kepler Lam
|
In this blog entry, I want to discuss how to use the open source tool UBridge to directly bridge the Windows PC to the VXLAN without using any VXLAN gateway.
UBridge is like the vSwitch inside the ESX, but UBridge is open source and can directly execute under the Windows command prompt. It’s now available inside the IPtools package, click here to download.You don’t need to even install it, all you need is to install the Winpcap.
To setup the VXLAN testing environment, you need to have at least one ESX server, vCenter server (while I use the Linux version) and vCenter client software.
I use the Cisco Nexus 1000v to configure the vDS for the VXLAN. Yes, I use Nexus instead of NSX. Honestly, I’m not a VMware guy, I am more familiar with the Cisco technology, also I’ve already have the N1K environment for testing.
The followings are software versions that being used:
- ESXi: 5.5.0 (VMkernel release build 1623387)
- vCenter: Server Appliance 5.5.0.10000-1624811
- VSM:nexus-1000v.4.2.1.SV2.2.2.bin
- VEM: Cisco_bootbank_cisco-vem-v160-esx_4.2.1.2.2.2.0-3.2.1.vib
For the minimal hardware requirement, I used VMware workstation in my local PC, and install the ESX as a guest VM, bridge the ESX NIC as my local PC’s NIC. Likewise, the vCenter server is also a guest VM of the VMware workstation.
I created 2 smallest VMs inside the ESX by using the DSL linux image.
Then setup the Nexus 1000v into the VMware infrastructure, which is a long journey and not the focus of this blog, please refer to the corresponding documentation (or can hire me!).
Following figures shows the ESX configuration:
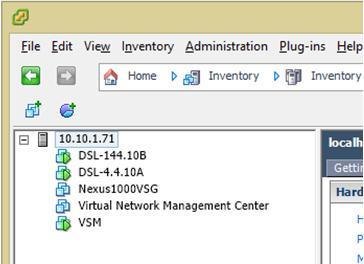
You don't actutally needs the VSG which is for my other testing.
Now, to setup the VXLAN in the Nexus 1000v, please following this next blog entry.
|
|
June 9, 2014 06:17:51
Posted By Kepler Lam
|
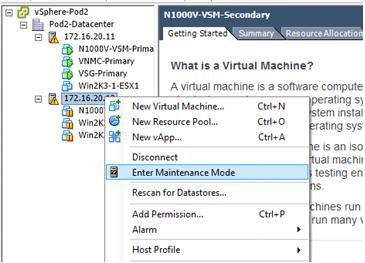
If you haven't read part 1, click here.
First suspend (or vMotion away) all the VMs running in the ESXi server (if your VSM is running on the ESXi server, remember to save it), put the server to maintenance mode using the vCenter.
Now uninstall the existing VEM by the following command:
/~ # esxcli software vib remove -n cisco-vem-v164-esx
Removal Result
Message: Operation finished successfully.
Reboot Required: false
VIBs Installed:
VIBs Removed: Cisco_bootbank_cisco-vem-v164-esx_4.2.1.2.2.2.0-3.2.1
VIBs Skipped:
If it doesn’t work for some reason, you may need to reboot your ESXi.
Then install the old VEM.
~ # esxcli software vib install -v /vmfs/volumes/Pod2-DataStore/Cisco_bootbank_cisco-vem-v160-esx_4.2.1.2.2.1.0-3.2.1.vib
Installation Result
Message: Operation finished successfully.
Reboot Required: false
VIBs Installed: Cisco_bootbank_cisco-vem-v160-esx_4.2.1.2.2.1.0-3.2.1
VIBs Removed:
VIBs Skipped:
Again, if you are not lucky, it may have some errors or warning, then you may need to reboot your ESXi.
Verify the version and the VEM is running:
~ # vem status
VEM modules are loaded
Switch Name Num Ports Used Ports Configured Ports MTU Uplinks
vSwitch0 1536 5 128 1500 vmnic4
VEM Agent (vemdpa) is running
~ # vem version
Running esx version -1623387 x86_64
VEM Version: 4.2.1.2.2.1.0-3.2.1
VSM Version:
System Version: VMware ESXi 5.5.0 Releasebuild-1623387
After that, back to your vCenter and remember to put your ESXi server to exit the maintenance mode. Then resume (or vMotion back) your VMs.
|
|
June 9, 2014 05:22:08
Posted By Kepler Lam
|
If you are working with the Nexus 1000v, probably you will find that to make sure the version compatibility is a headache.
This blog entry discusses if you have incorrectly installed a newer VEM version which is not compatible with your VSM, then you need to fallback to the old version. The steps are not really so trivial. To upgrade, it is easy. While downgrade is not!
Here I discuss down grade from 4.2.1.2.2.2.0-3.2.1 (fro VSM 4.2.1.SV2.2.2) to 4.2.1.2.2.1.0-3.2.1 (minimal version that support EXSi 5.5 and VSM version 4.2.1.SV2.2.1).
First, verify the existing version:
/vmfs/volumes/98a9ff49-e3284f0c # vem version
Running esx version -1623387 x86_64
VEM Version: 4.2.1.2.2.2.0-3.2.1
VSM Version:
System Version: VMware ESXi 5.5.0 Releasebuild-1623387
/vmfs/volumes/98a9ff49-e3284f0c # esxcli software vib list | head
Name Version Vendor Acceptance Level Install Date
----------------------------- ------------------------------------ ------ ---------------- ------------
cisco-vem-v164-esx 4.2.1.2.2.2.0-3.2.1 Cisco PartnerSupported 2014-05-15
Try directly installing the old version:
/vmfs/volumes/98a9ff49-e3284f0c # esxcli software vib install -v /vmfs/volumes/Pod2-DataStore/Cisco_bootbank_cisco-vem-v160-esx_4.2.1.2.2.1.0-3.2.1.vib
[MaintenanceModeError]
MaintenanceMode is required to remove: [Cisco_bootbank_cisco-vem-v164-esx_4.2.1.2.2.2.0-3.2.1]; install: [].
Please refer to the log file for more details.
Then try installing with the maintenance mode parameter:
~ # esxcli software vib install -v /vmfs/volumes/Pod2-DataStore/Cisco_bootbank_cisco-vem-v160-esx_4.2.1.2.2.1.0-3.2.1.vib --maintenance-mode
Installation Result
Message: Operation finished successfully.
Reboot Required: false
VIBs Installed: Cisco_bootbank_cisco-vem-v160-esx_4.2.1.2.2.1.0-3.2.1
VIBs Removed: Cisco_bootbank_cisco-vem-v164-esx_4.2.1.2.2.2.0-3.2.1
VIBs Skipped:
If you are lucky, you get the above result, then you are done. Unfortunately, for some reason, somtimes the above command won't work. Then you need to use a more complicated aproach. Please follow with my next blog entry.

Taken in my recent trip to deliver the Cisco Nexus 1000v training near the Washington DC area
|
|
|
|
