|
January 20, 2022 09:57:09
Posted By Kepler Lam
|
Want to discuss this topics long long time ago, that is the subnet calculation. As I find that many students are not really know how to find the subnet address of an given IP for non-byte boundary subnet mask such as /27, /19 etc.
That's understandable, as all the formal training (like CCNA) teaches how to do the calculation in binary, but who would like to deal with those 0's and 1's? Probably, nobody. So when I teach CCNA, I will teach them how to use decimal for the calculation. Especially, when you take the CCNA examination, no calculator (not to mention your mobile phone) is allowed, you need to do it by hand. Thus, you really need to learn a more effective way for those calculation.
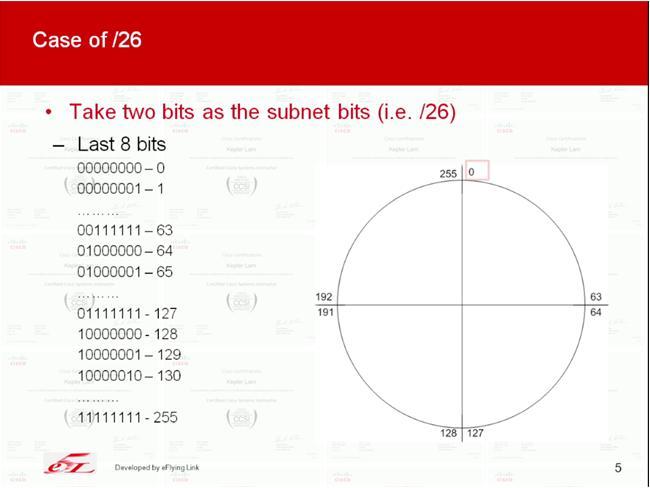
I've just created two youtube videos for the subnet calculation using decimal in Part 1 and Part 2. Part 1 will focus the basic technique for Class C network number and how to tackle one of the common question in the examination. While Part 2 discusses more common questions and the case for Class B and Class A network number.
In fact, its just like cutting a cake. E.g. following illustrate the case of /27 subnets

|
|
January 12, 2022 10:22:08
Posted By Kepler Lam
|
In the recent Cisco training courses, the whole certification track has been revised. For the CCNA course, personally I really think that it's no longer an introductory course (even for the previous version). As new topics that originally from other specialized training has been added into the course. Somewhat like SDN, wireless controller, those are no longer basic network technologies.
Of course, the key topics are still routing and switch. Yet, EIGRP has been taken out. The new version only discuss OSPF. As there are so many topics to discuss, obvious the course pace will be quite fast. If you are completely new to network, it's not easy to catch up.
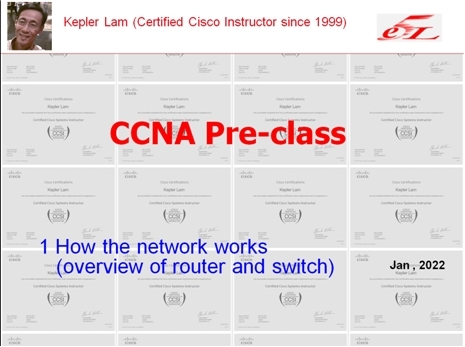
What I recommend (that's I already recommend 10 years ago!), before you attend the class, you should at least get some basic knowledge about switch and router, how they works in the network. Recently, I've created a youtube video CCNA Pre-class to help you getting the fundamental concepts. Even if you have been working in networking field for a short period of time, this video can help you clear all the basic concepts.
Besides, if you are new to Cisco equipment, try download some simulator (something like GNS3) and practice the basic command line interface before you attend the class.
|
|
December 28, 2020 04:35:42
Posted By Kepler Lam
|
Here I want to introduce a python script that allow you to remotely access your GNS3 projects by a SSH client (such as putty), only port 22 is required to be externally accessible.
Without the GNS3 client installed in your PC, it's difficult to start or stop projects remotely unless you can use remote desktop to login to the hosted Windows machine. Moreover, without knowing the console port number of the devices (unfortunately it changes randomly every time when you load the project), you cannot get the console access of the devices.
Think about, if you just setup some labs and want to share with others, but not willing to give the Windows access to the others, currently GNS doesn't provide a ready to use solution. So here, I create a python script which makes use of the REST API provided by the GNS3 to allow the remote access of the projects that have been created in the GNS.
Before I discuss how to setup the script, just want to show some of the screens provided by the script. It's very simple to use, just use putty and SSH to the GNS3 VM machine, after login, you will get a intuitive menu. It allows you to load and start different projects and then access the console of different devices of the project:

In the main menu, you can start, stop and check the status of the GNS. However, to remotely start the GNS (option 1), you need to setup two more tools: the rmcd provided in the iptools package and the AutoHotkey. As the setup is a bit complicated, I am not going to discuss it here, drop a comment below if anyone interest in it. Otherwise, don't use this option.
For option 2, it will display the available projects, just select the project, load and start it. Here are some projects example that I used to deliver the CCNP ROUTE course:
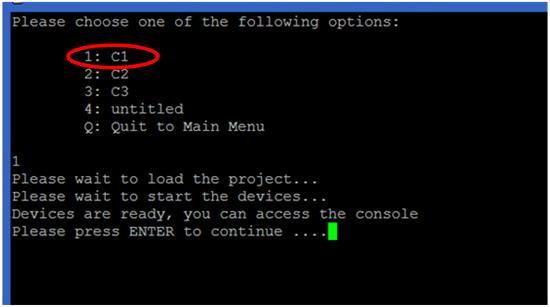
After the project started, press ENTER to go back to main menu. Under option 3 of the main menu, you can access the consoles of different devices of the project (following screen shows the devices in the selected project C1):
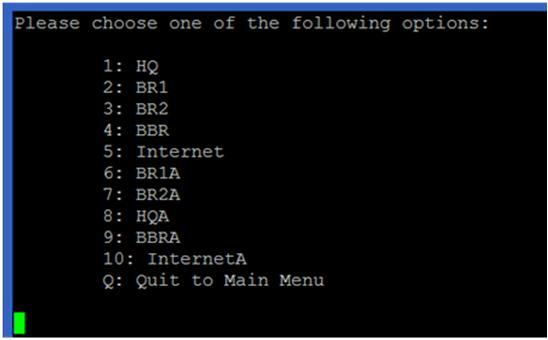
You can use Ctrl-] and quit to exit the console.
Option 4 of the main menu allows you to power cycle the devices. For option 5 and 6, they are for snapshot management. However, due to the issues of the GNS itself, these options doesn't function very well.
Now, I am going to discuss how to setup the script. As the script is written in python, so you can just execute it under any Linux machine that have the python installed. Of course, the most convenient way is to run the script under the GNS3 VM itself. Followings highly the major steps:
1. Configure and verify some GNS3 settings.
2. Download the script and put it under any path. Recommend to put it under /home/gns3.
3. Create a Linux user account and configure the script as the login script of the new account.
Configure and verify some GNS3 settings
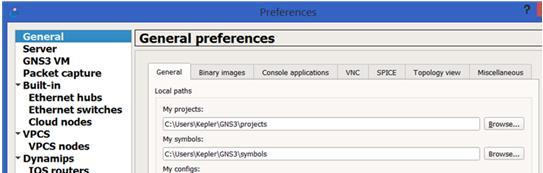
In fact, the only setting that need to be changed is to uncheck "Protect Server with password (recommended)" setting. You can find it under Edit > Preferences....> Server screen (as below).
Well, wait a minute... I know you may concern the security issue for uncheck this option. If you want to enable it, you may need to change the python script to handle the HTTP authentication which is not currently implemented. As in my environment, GNS3 is only used for testing or lab purpose, so should be under a restricted network. I believe it's not supposed to be used in production environment, if so, you should handle the security issue by yourself.

Another setting that you may want to check is under General > General tab, just verify your project path. You should put all the projects under the "My projects" path, as the python script will locate the projects under there.
Download the script and put it under any desirable path
You can find the script under https://github.com/keplerlam/gns3remote/blob/main/gns_admin.py
Download the script, edit the script, near the end of the script, change the following:
GNS_HOST="192.168.1.1" # Change the IP address to the machine host the GNS client
Then put it under the GNS VM. You can use the GNS VM console, start a command line (as shown below):
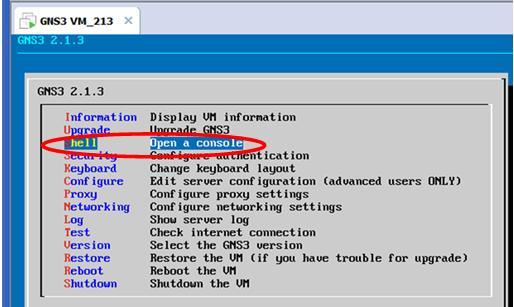
Under the Linux command prompt, you can use ftp or scp to copy the script from the file server (of course you need a FTP or SFTP server and download the script under the server first).
If you don't have the file server, maybe you can just copy and paste the script using the editor. It seems the only available editor under the GNS VM is nano. So under the Linux prompt:
gns3@gns3-iouvm:~$ nano gns_admin.py
Then paste the script content and save the file.
After that, you need to change the execution mode of the script:
gns3@gns3-iouvm:~$ chmod a+x gns_admin.py
Create a Linux user account and configure the script as the login script of the new account
Actually, you can test the script right now:
gns3@gns3-iouvm:~$ ./gns_admin.py
But most likely, you want to use another Linux user account and automatically run the script once login. You can use the adduser command, below is an example for adding an user tester:
gns3@gns3-iouvm:~$ sudo adduser tester
sudo: unable to resolve host gns3-iouvm
Adding user `tester' ...
Adding new group `tester' (1002) ...
Adding new user `tester' (1002) with group `tester' ...
Creating home directory `/home/tester' ...
Copying files from `/etc/skel' ...
Enter new UNIX password:
Retype new UNIX password:
passwd: password updated successfully
Changing the user information for tester
Enter the new value, or press ENTER for the default
Full Name []: Tester
Room Number []:
Work Phone []:
Home Phone []:
Other []:
Is the information correct? [Y/n] y
The last step is to configure the script to be automatically run when login to the newly created user tester by following command :
gns3@gns3-iouvm:~$ sudo chsh tester
sudo: unable to resolve host gns3-iouvm
Changing the login shell for tester
Enter the new value, or press ENTER for the default
Login Shell [/bin/bash]: /home/gns3/gns_admin.py
Now open a ssh session and login to the user tester to fire the script.
|
|
March 1, 2020 06:13:19
Posted By Kepler Lam
|
Just delivery the SIMOS class remotely, haven't been writing any blog entry for a long time, as its a very hard time in here. After almost half years of social campaign, its now still under the risk of coronavirus. Hopefully people in Hong Kong has the experience of SAS virus before, thus wearing mask everyday, and most likely it lower the chance of being infected.
Anyway, back to this bog entry which I want to compare the traditional DMVPN with the FlexVPN using the NHRP.
Although the functionsseems almost the same, both support the full mesh VPN tunnels. Both use static tunnel between the hub and all spokes sites, then establish dynamic tunnel between spokes sites on demand. The major different is the way how the spoke site learn the tunnel IP address of the other spoke site.
In the traditional DMVPN, the next hop address to the internal subnet of the other remote spoke site requires to be tunnel IP address of the remote spoke site.
E.g. in the following, the left spoke router finds the destination network (192.168.13.024) reachable over the 10.1.1.3 next hop on its mGRE interface.

In order to satisfy this requirement, you need to be care about the routing configuration.
For OSPF, you need to use the OSPF broadcast mode under the mGRE interface of all the spoke sites. If you use the default point-to-multipoint mode, the learnt next hop will become the hub's IP and simply won't work. Please refer to my other blog entry on OSPF mode in DMVPN configuration.
Similarly, for EIGRP, you need to disable the "next-hop-self" in the hub site's mGRE interface.
For the FlexVPN, you don't need to rely on the routing protocol to advertise the correct next hop. Instead, the hub site can advertise a default route to all spokes using the IKEv2 mode configure. So that, all spoke site will have a default route pointing to hub site.
Then what happen for spoke-to-spoke site traffic? Initially, the spoke will send the packet to the hub using the default route. But then the hub finds that the traffic can directly reach the other spoke using the remote spoke's tunnel IP, the hub will send a NHRP redirect (somewhat like the ICMP redirect) to the original spoke site, so that the original spoke will response a HNRP request to resolve the physical IP address of the remote site in order to establish the dynamic tunnel.
Following diagram illustrate the process:

Wish the above explains. Finally, may the God bless the the world to control the Wuhan virus.
|
|
April 3, 2019 07:40:22
Posted By Kepler Lam
|
To complete the discussion of the whole demostration. This last part disccus another supporting Python script nxapi_utils.py come from Cisco, it provides the ExecuteiAPICommand function call to connect to the Nexus box and execute the command. It just return the XML as "text", then the text can be passed into minidom.parseString which parses the fields and arrange the information into a python XML class (with hierarchy).
To get back the value of a particular field, there are 2 methods:
1. Use the GetNodeDataDom by passing the XML and the field name as the parameters.
2. or use the XML class method getElementsByTagName
Here is the script:
#!/usr/bin/env python
#
# tested with build n9000-dk9.6.1.2.I1.1.510.bin
#
# Copyright (C) 2013 Cisco Systems Inc.
#
# Licensed under the Apache License, Version 2.0 (the "License");
# you may not use this file except in compliance with the License.
# You may obtain a copy of the License at
#
# http://www.apache.org/licenses/LICENSE-2.0
#
# Unless required by applicable law or agreed to in writing, software
# distributed under the License is distributed on an "AS IS" BASIS,
# WITHOUT WARRANTIES OR CONDITIONS OF ANY KIND, either express or implied.
# See the License for the specific language governing permissions and
# limitations under the License.
import requests
def GetiAPICookie(url, username, password):
xml_string="<?xml version=\"1.0\" encoding=\"ISO-8859-1\"?> \
<ins_api> \
<version>0.1</version> \
<type>cli_show</type> \
<chunk>0</chunk> \
<sid>session1</sid> \
<input>show clock</input> \
<output_format>xml</output_format>\
</ins_api>"
try:
r = requests.post(url, data=xml_string, auth=(username, password))
except requests.exceptions.ConnectionError as e:
print "Connection Error"
else:
return r.headers['Set-Cookie']
def ExecuteiAPICommand(url, cookie, username, password, cmd_type, cmd):
headers = {'Cookie': cookie}
xml_string="<?xml version=\"1.0\" encoding=\"ISO-8859-1\"?> \
<ins_api> \
<version>0.1</version> \
<type>" + cmd_type + "</type> \
<chunk>0</chunk> \
<sid>session1</sid> \
<input>" + cmd + "</input> \
<output_format>xml</output_format> \
</ins_api>"
try:
r = requests.post(url, headers=headers, data=xml_string, auth=(username, password))
except requests.exceptions.ConnectionError as e:
print "Connection Error"
else:
return r.text
def GetNodeDataDom(dom,nodename):
# given a XML document, find an element by name and return it as a string
try:
node=dom.getElementsByTagName(nodename)
return (NodeAsText(node))
except IndexError:
return "__notFound__"
def NodeAsText(node):
# convert a XML element to a string
try:
nodetext=node[0].firstChild.data.strip()
return nodetext
except IndexError:
return "__na__"
The challenge of the script is the requirement to know the structure of the returned XML and the corresponding field names. This can be easily solved by using the NX-API Developer Sandbox.
|
|
April 3, 2019 07:10:22
Posted By Kepler Lam
|
Second part of intf.py:
def show_interfaces(IP):
form_str="""
<form action="/cgi-bin/WebMgr.py" method="post">
Switch IP Address List: <input type="text" name="IP" value=%s>
<input type="submit" value="Show">
</form>
"""%IP_STRING
if intf:
print "<h2>Nexus Web Manager - Show Interface</h2>"
print form_str
print """
<table>
<tr>
<th>Interface</th>
<th>Description</th>
<th>HW Addr</th>
<th>Speed</th>
<th>In Bytes</th>
<th>Out Bytes</th>
<th>Duplex</th>
</tr>
<tr>
"""
else:
print "<h2>Nexus Web Manager - Interface Management</h2>"
print form_str
print """
<table>
<tr>
<th>Interface</th>
<th>State</th>
<th>Vlan</th>
<th>Port Mode</th>
<th>Show Interfaces</th>
</tr>
<tr>
"""
url = 'http://'+IP+'/ins/'
cookie=GetiAPICookie(url, user, password)
if intf:
dom = minidom.parseString(ExecuteiAPICommand(url, cookie, user, password, "cli_show", "show interface %s"%intf))
intfdict=getIntf(dom)
dom = minidom.parseString(ExecuteiAPICommand(url, cookie, user, password, "cli_show_ascii", "show run interface %s"%intf))
run_cfg = NodeAsText(dom.getElementsByTagName("body"))
else:
dom = minidom.parseString(ExecuteiAPICommand(url, cookie, user, password, "cli_show", "show interface"))
intfdict=getIntf(dom)
dom = minidom.parseString(ExecuteiAPICommand(url, cookie, user, password, "cli_show", "show interface switchport"))
intfdict=getSwitchport(dom,intfdict)
for interface in intfdict.keys():
print "<tr>"
if intf:
print("<td>%s </td>" % (interface))
print("<td>%s </td>" % (intfdict[interface]['desc']))
print("<td>%s </td>" % (intfdict[interface]['HWaddr']))
print("<td>%s </td>" % (intfdict[interface]['speed']))
print("<td>%s </td>" % (intfdict[interface]['inbytes']))
print("<td>%s </td>" % (intfdict[interface]['outbytes']))
print("<td>%s </td>" % (intfdict[interface]['duplex']))
else:
print("<td>%s </td>" % (interface))
print("<td>%s </td>" % (intfdict[interface]['state']))
print("<td>%s </td>" % (intfdict[interface]['access_vlan']))
print("<td>%s </td>" % (intfdict[interface]['mode']))
form_str="""<td>
<form action="/cgi-bin/Intf.py" method="post">
<input type="hidden" name="Intf" value=%s>
<input type="hidden" name="IP_LIST" value=%s>
<input type="hidden" name="IP" value=%s>
<input type="submit" value="Show">
</form>
</td>
"""%(interface,IP_STRING,IP)
print form_str
print("</tr>")
return run_cfg
#################
# MAIN MODULE #
#################
# First things first: credentials. They should be parsed through sys.argv[] ideally ..
form = cgi.FieldStorage()
# Get data from fields
IP = form.getvalue('IP')
IP_STRING = form.getvalue('IP_LIST')
intf = form.getvalue('Intf')
user="admin"
password="dummy"
print("Content-type:text/html")
print """
<head>
<style>
table {
font-family: arial, sans-serif;
border-collapse: collapse;
width: 100%;
}
td, th {
border: 1px solid #dddddd;
text-align: left;
padding: 8px;
}
</style>
</head>
<body>
"""
run_cfg=show_interfaces(IP)
if intf:
print "<table><tr><td>"
print run_cfg.replace("\n","<br />\n")
print "</table>"
print "</table>"
Thus actually, depending on whether the interface name is passed to Intf.py script or not, the flow is a bit different. When it gets the interface name, it calls "show interface interface_name" and "show run interface interface_name " to get the detail and display the information.
Click here to continue to the last part.
|
|
April 3, 2019 07:00:22
Posted By Kepler Lam
|
Thus actually, depending on whether the interface name is passed to Intf.py script or not, the flow is a bit different. When it gets the interface name, it calls "show interface interface_name" and "show run interface interface_name " to get the detail and display the information.

Here is the intf.py (as its too long, I will break it down into another blog):
#!/usr/bin/env python
#
import cgi, cgitb
from xml.dom import minidom
from nxapi_utils import *
def getIntf(xml):
interfaces = xml.getElementsByTagName("ROW_interface")
# build a dictionary of interface with key = interface
# the format of the dictionary is as follows:
intfdict = {}
for interface in interfaces:
intfname = NodeAsText(interface.getElementsByTagName("interface"))
intfstate = NodeAsText(interface.getElementsByTagName("state"))
intfdesc = NodeAsText(interface.getElementsByTagName("desc"))
intfhwaddr = NodeAsText(interface.getElementsByTagName("eth_hw_addr"))
intfspeed = NodeAsText(interface.getElementsByTagName("eth_speed"))
intfduplex = NodeAsText(interface.getElementsByTagName("eth_duplex"))
intfinbytes = NodeAsText(interface.getElementsByTagName("eth_inbytes"))
intfoutbytes = NodeAsText(interface.getElementsByTagName("eth_outbytes"))
intfdict[intfname]={'state': intfstate, \
'desc': intfdesc, \
'access_vlan': "N/A", \
'mode': "L3", \
'speed': intfspeed, \
'duplex': intfduplex, \
'inbytes': intfinbytes, \
'outbytes': intfoutbytes, \
'HWaddr': intfhwaddr}
return intfdict
def getSwitchport(xml,intfdict):
interfaces = xml.getElementsByTagName("ROW_interface")
# build a dictionary of interface with key = interface
# the format of the dictionary is as follows:
# neighbors = {'intf': {neighbor: 'foo', remoteport: 'x/y', model: 'bar'}}
for interface in interfaces:
intfname = NodeAsText(interface.getElementsByTagName("interface"))
intfswitchport = NodeAsText(interface.getElementsByTagName("switchport"))
intfvlan = NodeAsText(interface.getElementsByTagName("access_vlan"))
intfmode = NodeAsText(interface.getElementsByTagName("oper_mode"))
intfdict[intfname]['switchport']= intfswitchport
intfdict[intfname]['access_vlan']= intfvlan
intfdict[intfname]['mode']= intfmode
return intfdict
Click here to continue.
|
|
April 3, 2019 05:47:23
Posted By Kepler Lam
|
In the NX-OS 9K training, I created a sample Webportal (by modifying some code from Github) to demonstrate the usage of the NX-API, here I want to share it.
The purpose of the Webportal is just allow an user enter a list of Nexus 9K Management IP, then it display some version information of them. The user can then select one of the 9K to view the interfaces' information. Finally, can select the interface to view more detail.
The portal is quite straight forward. The first screen just a pure form to prompt user to enter the list of IP addresses. The form action will then call the python script WebMgr.py to process the form data (which is just the list of IP addresses).

Here's the HTML:
<h2>Nexus Web Manager</h2>
<form action="/cgi-bin/WebMgr.py" method="post">
Switch IP Address List: <input type="text" name="IP">
<input type="submit" value="Show">
</form>
The WebMgr.py python script get back the form data by form.getvalue('IP'), then connect to each of the IP address (username and password is HARD CODED inside the script, as an exercise, reader can modify the form to prompt user to enter them), use the Nexus API to do a "show version" and parse some of the information, then display them one by one in a table. Moreover, on the last table column, create a form button with action to call Intf.py by passing the corresponding Nexus 9K management IP to it.

Here is the WebMgr.py:
#!/usr/bin/env python
#
import cgi, cgitb
from xml.dom import minidom
from nxapi_utils import *
#################
# MAIN MODULE #
#################
# First things first: credentials. They should be parsed through sys.argv[] ideally ..
form = cgi.FieldStorage()
# Get data from fields
IP_STRING = form.getvalue('IP')
IP_LIST=IP_STRING.split(",")
user="admin"
password="dummy"
print("Content-type:text/html")
print """
<head>
<style>
table {
font-family: arial, sans-serif;
border-collapse: collapse;
width: 100%%;
}
td, th {
border: 1px solid #dddddd;
text-align: left;
padding: 8px;
}
</style>
</head>
<body>
<h2>Nexus Web Manager</h2>
<form action="/cgi-bin/WebMgr.py" method="post">
Switch IP Address List: <input type="text" name="IP" value=%s>
<input type="submit" value="Show">
</form>
<table>
<tr>
<th>IP Address</th>
<th>Hostname</th>
<th>Version</th>
<th>Show Interfaces</th>
</tr>
<tr>
"""%format(IP_STRING)
for IP in IP_LIST:
url = 'http://'+IP+'/ins/'
cookie=GetiAPICookie(url, user, password)
dom = minidom.parseString(ExecuteiAPICommand(url, cookie, user, password, "cli_show", "show version"))
host_name=GetNodeDataDom(dom,"host_name")
kickstart_ver_str=GetNodeDataDom(dom,"kickstart_ver_str")
print "<tr>"
print("<td>%s </td>" % (IP))
print("<td>%s </td>" % (host_name))
print("<td>%s </td>" % (kickstart_ver_str))
form_str="""<td>
<form action="/cgi-bin/Intf.py" method="post">
<input type="hidden" name="IP_LIST" value=%s>
<input type="hidden" name="IP" value=%s>
<input type="submit" value="Manager">
</form>
</td>
"""%(IP_STRING,IP)
print form_str
print("</tr>")
print "</table>"
Inside the Intf.py script, just like the WebMgr.py, after getting back the form data (IP address), it uses the Nexus API to do a "show interface" and "show interface switchport" commands, to get information such as the status, VLAN about the interfaces. Again, just display as a table, and in the last column, also create a form button to display the detail of that interface. This time the form action calls back the Intf.py script with an additional information which is the interface name.

Please follow this link to continue with next part.
|
|
November 29, 2018 11:08:06
Posted By Kepler Lam
|
As in the previous blog, I want to compare and relate some Cisco network features with the AWS VPC. Here let's see the NAT feature in the AWS. Here I want to focus the concept and mechanism, please refer to the AWS document for the detail configuration.
If you are familiar with the NAT function in Cisco routers, there are basically 3 different types:
- One-to-one (static NAT)
- Many-to-many (dynamic NAT)
- Many-to-one (PAT)
Actually you can also have these 3 different kinds of NAT configuration in the VPC of AWS. To understand this, you need to understand the logical layer 3 architecture of the VPC and the address assignment in AWS.
In fact, the routing (logical) structure of the AWS is quite straightforward, after you create the VPC, you have a VPC Router that routes between the internal subnets (with private IP addresses) within the VPC. To go out to Internet, there is another Internet Router that logically connected with the VPC router which has a default route pointing to the Internet router. Like the following diagram:

The Internet Router is also responsible for the NAT.
Obvious to access Internet your instance (VM) requires a global IP address. In AWS, there are 2 kinds of global IP address (the name is a bit confusing):
- Elastic IP – AWS allocate five global Internet IP addresses for every AWS account by default, these IP addresses are owned by your account, so will not be shared with others. You can freely map it to any private IP address in your VPCs. But AWS DO charge the usage of this so called Elastic IP, if you allocate it but not associate with any instance, or even associated but the instance is stopped (please refer to the AWS pricing, as I am not focusing on the price of AWS in this technical blog, but just be aware of it).
- Public IP - allocated from a pool of global IP addresses maintained by Amazon. This address pool is globally shared by all users, and dynamically assigned, that means you may not be able to permanently use it. As AWS may release this IP address from your instance and assign another one to it. If you require a persistence global IP address, you should use the Elastic IP.
Now let's discuss how to implement the 3 different types if NAT in AWS.
One-to-one
The usage of one-to-one NAT is usually because your instance is acting as a public server that requires a fix global IP address. According to the above discussion of global IP address types, most likely you already figure out which kind of global IP to be used? Yes, Elastic IP. You need to assign one of the Elastic IP addresses from your account and assign it to interface of the instance.
Note that from the configuration point of view, it seems that the interface right now have 2 IP addresses - one private address of the internal subnet, other is the Elastic IP (like multihome), but actually it is not! The private address to public address translation occurs on the Internet router, just like the normal NAT case of a standard network.
Many-to-many
You may want to use this kind of NAT if your instance requires to use any application that is not PAT friendly such as application that requires fixed port number. If so, you can either enable the allocation of a public IP (not Elastic) for instance on a subnet, or you can directly enable the allocation on the instance itself. Just like the one-to-one case, this public IP is not actually configured on the interface of the instance (which still only have the private IP address), instead the mapping is implemented in the Internet router.
Many-to-one
Actually this is the most common case for those instances that just need to access the Internet as clients. Then they can share a common global IP address using different port numbers when going out to the Internet.
To use this kind of NAT, you need to allocate another NAT Gateway or NAT instance. From functional point of view, NAT Gateway and NAT instance are more or less the same, the only difference is that NAT instance is implemented by a Linux instance which is actually cheaper in the cost (as AWS do charge for NAT Gateway usage). The NAT Gateway (instance) requires to be assigned an Elastic IP address.
The NAT Gateway is just liked a single armed router, its interface is also on a private subnet just like other instance of your VPC, the VPC router will need to change the default route to point to the NAT gateway. For traffic bounded to Internet, the VPC router send the packet to the NAT gateway which will change the source address to itself interface address (which is actually still private IP) using PAT i.e. the port number maybe change. As the NAT gateway has a default route to the Internet Gateway (NAT occurs in there). Therefore, the packet is send to the Internet Gateway which will change the source IP address to the Elastic IP address of the NAT gateway.

|
|
October 23, 2018 10:46:05
Posted By Kepler Lam
|
In this Blog entry, I want to compare some basic concept of the Cisco ACI with the AWS VPC. As ACI is the SDN solution by Cisco to build the private cloud, while AWS VPC service is a public cloud solution for the Data Center network.
Before the discussion, let's see the term SDN first. As there are different interpretations of SDN, yet what's the most fundamental meaning? After I discuss the traditional hardware base network, then you should be able to define SDN. Think about in the old time, if you have 2 sets of servers, for security reason, you want to put them in 2 different "domain" i.e. subnets. Obviously, you also need to allow them to be able to communicate. Then what network devices you need to implement? Actually, this is the most basic form of network, you may deploy 2 switches (or one switch with 2 VLANs) and connect the switches with a router. As the figure below:

What's the corresponding logical network? In nowadays data center, how will you setup the corresponding infrastructure? First of all, we won't use physical servers anymore, instead VMs are being deployed. If I refer it as Software Defined Servers, then you should understand what I mean Software Defined Network. We want to use software to create (define) a logical network, then use this logical network for connecting those logical servers which are the VMs. As below:

That's the motivation of ACI. Of course we still need a physical network (just like physical servers) which consists of a set of Nexus 9K, but on top, we use overlay to create logical (or virtual) networks (similar to the concept of creating VMs inside physical server). Think about for every physical network topology, logically you can just view it as a core layer 3 network connecting different layer 2 segments. Just like the figure below:

Or no matter how many routers inside the layer 3 core, it can be degenerated to one single router as Figure 2.
So Figure 2 is the most basic form of a network, its the fundamental building block. In ACI, it is referred as context (technically speaking, it is a VRF), while in AWS, it is called VPC. Of course, you can create many contexts within one tenant, similarly you can have multiple VPCs in your AWS account.
In ACI, layer 2 domain is called Bridge Domain (BD), while VPC just use the term subnet. When you create bridge domain, you need to assign the subnet by actually assigning the default gateway IP address. Hosts that attach to the bridge domain can use that IP as the gateway. While the subnet in VPC actually define the subnet address only, its a bit magic for the default gateway IP. Because when you start the VM (AWS refer it as instance), it will automatically get an IP address from the subnet and set the default gateway IP (AWS has tailored the operating system's LAN card driver to perform this).
For security point of view, in ACI, there is one more level inside the Bridge Domain, which is called EPG (end point group) . You can have multiple EPGs within a BD. No traffic control within the EPG, to allow traffic between 2 different EPGs, you need to define contracts (somewhat like ACL without IP address) between them.
Hosts are assigned to the EPG, for bare metal, need to assigned the connected physical port. For VMs, Cisco integrate with the Hypervisor system (VMware, HyperV), the EPG will be mapped to Port Group in vCenter and assign to the VNIC of the VMs. The advantage of using EPGs is the isolation of IP address in the contract, and the EPG membership will not change when VMs are moved across different ESXi servers using Vmotion.
In the case of VPC, because you don't need to manage a separate VM system. AWS EC2 service already provide the VM service. Actually you can only launch VMs (instance), you don't need bare mental server anymore. Thus VPC don't require something like EPG, but you can assign security group (somewhat like the port ACL) to control inbound and/or outbound traffic of individual instance. Or use network ACL (like the router ACL) and assign to the corresponding subnet to control traffic to and from the subnet.
Following figure shows the above concepts:

|
|
|
|
