Posted By Kepler Lam

Here I want to introduce a python script that allow you to remotely access your GNS3 projects by a SSH client (such as putty), only port 22 is required to be externally accessible.

Without the GNS3 client installed in your PC, it's difficult to start or stop projects remotely unless you can use remote desktop to login to the hosted Windows machine. Moreover, without knowing the console port number of the devices (unfortunately it changes randomly every time when you load the project), you cannot get the console access of the devices.

Think about, if you just setup some labs and want to share with others, but not willing to give the Windows access to the others, currently GNS doesn't provide a ready to use solution. So here, I create a python script which makes use of the REST API provided by the GNS3 to allow the remote access of the projects that have been created in the GNS.

Before I discuss how to setup the script, just want to show some of the screens provided by the script. It's very simple to use, just use putty and SSH to the GNS3 VM machine, after login, you will get a intuitive menu. It allows you to load and start different projects and then access the console of different devices of the project:

main

In the main menu, you can start, stop and check the status of the GNS. However, to remotely start the GNS (option 1), you need to setup two more tools: the rmcd provided in the iptools package and the AutoHotkey. As the setup is a bit complicated, I am not going to discuss it here, drop a comment below if anyone interest in it. Otherwise, don't use this option.

For option 2, it will display the available projects, just select the project, load and start it. Here are some projects example that I used to deliver the CCNP ROUTE course:

projs

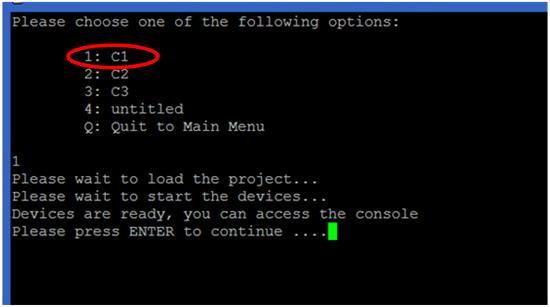
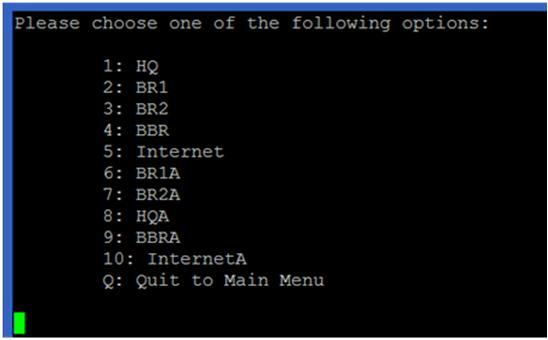
After the project started, press ENTER to go back to main menu. Under option 3 of the main menu, you can access the consoles of different devices of the project (following screen shows the devices in the selected project C1):

devices

You can use Ctrl-] and quit to exit the console.

Option 4 of the main menu allows you to power cycle the devices. For option 5 and 6, they are for snapshot management. However, due to the issues of the GNS itself, these options doesn't function very well.

Now, I am going to discuss how to setup the script. As the script is written in python, so you can just execute it under any Linux machine that have the python installed. Of course, the most convenient way is to run the script under the GNS3 VM itself. Followings highly the major steps:

1. Configure and verify some GNS3 settings.

2. Download the script and put it under any path. Recommend to put it under /home/gns3.

3. Create a Linux user account and configure the script as the login script of the new account.


Configure and verify some GNS3 settings

In fact, the only setting that need to be changed is to uncheck "Protect Server with password (recommended)" setting. You can find it under Edit > Preferences....> Server screen (as below).

Well, wait a minute... I know you may concern the security issue for uncheck this option. If you want to enable it, you may need to change the python script to handle the HTTP authentication which is not currently implemented. As in my environment, GNS3 is only used for testing or lab purpose, so should be under a restricted network. I believe it's not supposed to be used in production environment, if so, you should handle the security issue by yourself.

srv_pref
 

Another setting that you may want to check is under General > General tab, just verify your project path. You should put all the projects under the "My projects" path, as the python script will locate the projects under there.


prj_path
 

Download the script and put it under any desirable path

You can find the script under https://github.com/keplerlam/gns3remote/blob/main/gns_admin.py

Download the script, edit the script, near the end of the script, change the following:

GNS_HOST="192.168.1.1"   # Change the IP address to the machine host the GNS client

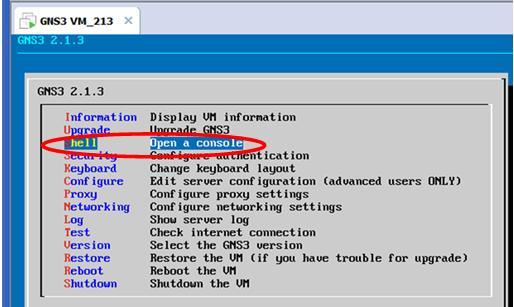
Then put it under the GNS VM. You can use the GNS VM console, start a command line (as shown below):

shell
 

Under the Linux command prompt, you can use ftp or scp to copy the script from the file server (of course you need a FTP or SFTP server and download the script under the server first).

If you don't have the file server, maybe you can just copy and paste the script using the editor. It seems the only available editor under the GNS VM is nano. So under the Linux prompt:

gns3@gns3-iouvm:~$ nano gns_admin.py

Then paste the script content and save the file.

After that, you need to change the execution mode of the script:

gns3@gns3-iouvm:~$ chmod a+x gns_admin.py


Create a Linux user account and configure the script as the login script of the new account

Actually, you can test the script right now:

gns3@gns3-iouvm:~$ ./gns_admin.py

But most likely, you want to use another Linux user account and automatically run the script once login. You can use the adduser command, below is an example for adding an user tester:

gns3@gns3-iouvm:~$ sudo adduser tester

sudo: unable to resolve host gns3-iouvm

Adding user `tester' ...

Adding new group `tester' (1002) ...

Adding new user `tester' (1002) with group `tester' ...

Creating home directory `/home/tester' ...

Copying files from `/etc/skel' ...

Enter new UNIX password:

Retype new UNIX password:

passwd: password updated successfully

Changing the user information for tester

Enter the new value, or press ENTER for the default

        Full Name []: Tester

        Room Number []:

        Work Phone []:

        Home Phone []:

        Other []:

Is the information correct? [Y/n] y

The last step is to configure the script to be automatically run when login to the newly created user tester by following command :

gns3@gns3-iouvm:~$ sudo chsh tester

sudo: unable to resolve host gns3-iouvm

Changing the login shell for tester

Enter the new value, or press ENTER for the default

        Login Shell [/bin/bash]: /home/gns3/gns_admin.py

Now open a ssh session and login to the user tester to fire the script.


Posted By Kepler Lam

To complete the discussion of the whole demostration. This last part disccus another supporting Python script nxapi_utils.py come from Cisco, it provides the ExecuteiAPICommand function call to connect to the Nexus box and execute the command. It just return the XML as "text", then the text can be passed into minidom.parseString which parses the fields and arrange the information into a python XML class (with hierarchy).

To get back the value of a particular field, there are 2 methods:

1. Use the GetNodeDataDom by passing the XML and the field name as the parameters.

2. or use the XML class method getElementsByTagName

Here is the script:

#!/usr/bin/env python
#
# tested with build n9000-dk9.6.1.2.I1.1.510.bin
#
# Copyright (C) 2013 Cisco Systems Inc.
#
# Licensed under the Apache License, Version 2.0 (the "License");
# you may not use this file except in compliance with the License.
# You may obtain a copy of the License at
#
#      http://www.apache.org/licenses/LICENSE-2.0
#
# Unless required by applicable law or agreed to in writing, software
# distributed under the License is distributed on an "AS IS" BASIS,
# WITHOUT WARRANTIES OR CONDITIONS OF ANY KIND, either express or implied.
# See the License for the specific language governing permissions and
# limitations under the License.


import requests

def GetiAPICookie(url, username, password):
    xml_string="<?xml version=\"1.0\" encoding=\"ISO-8859-1\"?> \
      <ins_api>                         \
      <version>0.1</version>            \
      <type>cli_show</type>             \
      <chunk>0</chunk>                  \
      <sid>session1</sid>               \
      <input>show clock</input>         \
      <output_format>xml</output_format>\
      </ins_api>"
    try:
        r = requests.post(url, data=xml_string, auth=(username, password))
    except requests.exceptions.ConnectionError as e:
        print "Connection Error"
    else:
        return r.headers['Set-Cookie']

def ExecuteiAPICommand(url, cookie, username, password, cmd_type, cmd):
    headers = {'Cookie': cookie}

    xml_string="<?xml version=\"1.0\" encoding=\"ISO-8859-1\"?> \
     <ins_api>                          \
     <version>0.1</version>             \
     <type>" + cmd_type + "</type>      \
     <chunk>0</chunk>                   \
     <sid>session1</sid>                \
     <input>" + cmd + "</input>         \
     <output_format>xml</output_format> \
     </ins_api>"

    try:
        r = requests.post(url, headers=headers, data=xml_string, auth=(username, password))
    except requests.exceptions.ConnectionError as e:
        print "Connection Error"
    else:
        return r.text

def GetNodeDataDom(dom,nodename):
    # given a XML document, find an element by name and return it as a string
    try:
     node=dom.getElementsByTagName(nodename)
     return (NodeAsText(node))
    except IndexError:
     return "__notFound__"

def NodeAsText(node):
    # convert a XML element to a string
    try:
     nodetext=node[0].firstChild.data.strip()
     return nodetext
    except IndexError:
     return "__na__"   

The challenge of the script is the requirement to know the structure of the returned XML and the corresponding field names. This can be easily solved by using the NX-API Developer Sandbox.


Posted By Kepler Lam

Second part of intf.py:

def show_interfaces(IP):

   form_str="""
   <form action="/cgi-bin/WebMgr.py" method="post">
      Switch IP Address List: <input type="text" name="IP" value=%s>
      <input type="submit" value="Show">
   </form>
   """%IP_STRING

   if intf:
      print "<h2>Nexus Web Manager - Show Interface</h2>"
      print form_str
      print """
      <table>
        <tr>
          <th>Interface</th>
          <th>Description</th>
          <th>HW Addr</th>
          <th>Speed</th>
          <th>In Bytes</th>
          <th>Out Bytes</th>
          <th>Duplex</th>
        </tr>
        <tr>
      """

   else:
      print "<h2>Nexus Web Manager - Interface Management</h2>"
      print form_str
      print """
      <table>
        <tr>
          <th>Interface</th>
          <th>State</th>
          <th>Vlan</th>
          <th>Port Mode</th>
          <th>Show Interfaces</th>
        </tr>
        <tr>
      """

   url = 'http://'+IP+'/ins/'
   cookie=GetiAPICookie(url, user, password)

   if intf:
      dom = minidom.parseString(ExecuteiAPICommand(url, cookie, user, password, "cli_show", "show interface %s"%intf))
      intfdict=getIntf(dom)
      dom = minidom.parseString(ExecuteiAPICommand(url, cookie, user, password, "cli_show_ascii", "show run interface %s"%intf))
      run_cfg = NodeAsText(dom.getElementsByTagName("body"))
   else:
      dom = minidom.parseString(ExecuteiAPICommand(url, cookie, user, password, "cli_show", "show interface"))
      intfdict=getIntf(dom)
      dom = minidom.parseString(ExecuteiAPICommand(url, cookie, user, password, "cli_show", "show interface switchport"))
      intfdict=getSwitchport(dom,intfdict)

   for interface in intfdict.keys():
      print "<tr>"
      if intf:
         print("<td>%s </td>" % (interface))
         print("<td>%s </td>" % (intfdict[interface]['desc']))
         print("<td>%s </td>" % (intfdict[interface]['HWaddr']))
         print("<td>%s </td>" % (intfdict[interface]['speed']))
         print("<td>%s </td>" % (intfdict[interface]['inbytes']))
         print("<td>%s </td>" % (intfdict[interface]['outbytes']))
         print("<td>%s </td>" % (intfdict[interface]['duplex']))
      else:
         print("<td>%s </td>" % (interface))
         print("<td>%s </td>" % (intfdict[interface]['state']))
         print("<td>%s </td>" % (intfdict[interface]['access_vlan']))
         print("<td>%s </td>" % (intfdict[interface]['mode']))

         form_str="""<td>
           <form action="/cgi-bin/Intf.py" method="post">
           <input type="hidden" name="Intf" value=%s>
           <input type="hidden" name="IP_LIST" value=%s>
           <input type="hidden" name="IP" value=%s>
           <input type="submit" value="Show">
           </form>
         </td>
         """%(interface,IP_STRING,IP)
         print form_str

      print("</tr>")

   return run_cfg

#################
#  MAIN MODULE  #
#################

# First things first: credentials. They should be parsed through sys.argv[] ideally ..
form = cgi.FieldStorage()
# Get data from fields
IP = form.getvalue('IP')
IP_STRING = form.getvalue('IP_LIST')
intf = form.getvalue('Intf')
user="admin"
password="dummy"

print("Content-type:text/html")
print """
<head>
<style>
table {
  font-family: arial, sans-serif;
  border-collapse: collapse;
  width: 100%;
}

td, th {
  border: 1px solid #dddddd;
  text-align: left;
  padding: 8px;
}

</style>
</head>
<body>
"""

run_cfg=show_interfaces(IP)

if intf:
   print "<table><tr><td>"
   print run_cfg.replace("\n","<br />\n")
   print "</table>"

print "</table>"

Thus actually, depending on whether the interface name is passed to Intf.py script or not, the flow is a bit different. When it gets the interface name, it calls "show interface interface_name" and "show run interface interface_name " to get the detail and display the information.

Click here to continue to the last part.


Posted By Kepler Lam

Thus actually, depending on whether the interface name is passed to Intf.py script or not, the flow is a bit different. When it gets the interface name, it calls "show interface interface_name" and "show run interface interface_name " to get the detail and display the information.

intf2
Here is the intf.py (as its too long, I will break it down into another blog):

#!/usr/bin/env python
#
import cgi, cgitb

from xml.dom import minidom
from nxapi_utils import *

def getIntf(xml):
    interfaces = xml.getElementsByTagName("ROW_interface")

    # build a dictionary of interface with key = interface
    # the format of the dictionary is as follows:
    intfdict = {}
    for interface in interfaces:
        intfname  =  NodeAsText(interface.getElementsByTagName("interface"))
        intfstate =  NodeAsText(interface.getElementsByTagName("state"))
        intfdesc  =  NodeAsText(interface.getElementsByTagName("desc"))
        intfhwaddr =  NodeAsText(interface.getElementsByTagName("eth_hw_addr"))
        intfspeed =  NodeAsText(interface.getElementsByTagName("eth_speed"))
        intfduplex =  NodeAsText(interface.getElementsByTagName("eth_duplex"))
        intfinbytes =  NodeAsText(interface.getElementsByTagName("eth_inbytes"))
        intfoutbytes =  NodeAsText(interface.getElementsByTagName("eth_outbytes"))
        intfdict[intfname]={'state': intfstate, \
                          'desc': intfdesc, \
                          'access_vlan': "N/A", \
                          'mode': "L3", \
                          'speed': intfspeed, \
                          'duplex': intfduplex, \
                          'inbytes': intfinbytes, \
                          'outbytes': intfoutbytes, \
                          'HWaddr': intfhwaddr}
    return intfdict

def getSwitchport(xml,intfdict):
    interfaces = xml.getElementsByTagName("ROW_interface")

    # build a dictionary of interface with key = interface
    # the format of the dictionary is as follows:
    # neighbors = {'intf': {neighbor: 'foo', remoteport: 'x/y', model: 'bar'}}    
    for interface in interfaces:
        intfname  =  NodeAsText(interface.getElementsByTagName("interface"))
        intfswitchport =  NodeAsText(interface.getElementsByTagName("switchport"))
        intfvlan  =  NodeAsText(interface.getElementsByTagName("access_vlan"))
        intfmode =  NodeAsText(interface.getElementsByTagName("oper_mode"))
        intfdict[intfname]['switchport']= intfswitchport
        intfdict[intfname]['access_vlan']= intfvlan
        intfdict[intfname]['mode']= intfmode
    return intfdict

Click here to continue.


Posted By Kepler Lam

In the NX-OS 9K training, I created a sample Webportal (by modifying some code from Github) to demonstrate the usage of the NX-API, here I want to share it.

The purpose of the Webportal is just allow an user enter a list of Nexus 9K Management IP, then it display some version information of them. The user can then select one of the 9K to view the interfaces' information. Finally, can select the interface to view more detail.

The portal is quite straight forward. The first screen just a pure form to prompt user to enter the list of IP addresses. The form action will then call the python script WebMgr.py to process the form data (which is just the list of IP addresses).

indexhtml

Here's the HTML:

<h2>Nexus Web Manager</h2>

<form action="/cgi-bin/WebMgr.py" method="post">
     Switch IP Address List: <input type="text" name="IP">
     <input type="submit" value="Show">
</form>

The WebMgr.py python script get back the form data by  form.getvalue('IP'), then connect to each of the IP address (username and password is HARD CODED inside the script, as an exercise, reader can modify the form to prompt user to enter them), use the Nexus API to do a "show version" and parse some of the information, then display them one by one in a table. Moreover, on the last table column, create a form button with action to call Intf.py by passing the corresponding Nexus 9K management IP to it.

Webmgr
Here is the WebMgr.py:

#!/usr/bin/env python
#

import cgi, cgitb

from xml.dom import minidom
from nxapi_utils import *

#################
#  MAIN MODULE  #
#################

# First things first: credentials. They should be parsed through sys.argv[] ideally ..
form = cgi.FieldStorage()
# Get data from fields
IP_STRING = form.getvalue('IP')
IP_LIST=IP_STRING.split(",")
user="admin"
password="dummy"

print("Content-type:text/html")

print """
<head>
<style>
table {
  font-family: arial, sans-serif;
  border-collapse: collapse;
  width: 100%%;
}

td, th {
  border: 1px solid #dddddd;
  text-align: left;
  padding: 8px;
}

</style>
</head>
<body>

<h2>Nexus Web Manager</h2>

<form action="/cgi-bin/WebMgr.py" method="post">
     Switch IP Address List: <input type="text" name="IP" value=%s>
     <input type="submit" value="Show">
</form>
<table>
  <tr>
    <th>IP Address</th>
    <th>Hostname</th>
    <th>Version</th>
    <th>Show Interfaces</th>
  </tr>
  <tr>
"""%format(IP_STRING)

for IP in IP_LIST:
   url = 'http://'+IP+'/ins/'
   cookie=GetiAPICookie(url, user, password)
   dom = minidom.parseString(ExecuteiAPICommand(url, cookie, user, password, "cli_show", "show version"))
   host_name=GetNodeDataDom(dom,"host_name")
   kickstart_ver_str=GetNodeDataDom(dom,"kickstart_ver_str")

   print "<tr>"
   print("<td>%s </td>" % (IP))
   print("<td>%s </td>" % (host_name))
   print("<td>%s </td>" % (kickstart_ver_str))

   form_str="""<td>
     <form action="/cgi-bin/Intf.py" method="post">
     <input type="hidden" name="IP_LIST" value=%s>
     <input type="hidden" name="IP" value=%s>
     <input type="submit" value="Manager">
     </form>
   </td>
   """%(IP_STRING,IP)
   print form_str

   print("</tr>")

print "</table>"

Inside the Intf.py script, just like the WebMgr.py, after getting back the form data (IP address), it uses the Nexus API to do a "show interface" and "show interface switchport" commands, to get information such as the status, VLAN about the interfaces. Again, just display as a table, and in the last column, also create a form button to display the detail of that interface. This time the form action calls back the Intf.py script with an additional information which is the interface name.

intf1
 

Please follow this link to continue with next part.


Posted By Kepler Lam

In a customized OpenStack training, the client asked for an example of using the Python code to create an instance, here I want to share how to do it.

Basically the script consists of the following steps:

  1. Import the python client library
  2. Get the authentication information
  3. Create a client object by passing the authentication parameters
  4. Use the client object to perform different operations

Let me show you the code for each step.

Import the python client library

from novaclient import client

Get the authentication information

Create a dictionary variable and get the credential information from corresponding environment variables.

def get_nova_creds():
    d = {}
    d['username'] = os.environ['OS_USERNAME']
    d['api_key'] = os.environ['OS_PASSWORD']
    d['auth_url'] = os.environ['OS_AUTH_URL']
    d['project_id'] = os.environ['OS_TENANT_NAME']
    return d

Create a client object by passing the authentication parameters

creds = get_nova_creds()
nova = client.Client('2.0',**creds)

Use the client object to perform different operations

Once you create the Nova client object, you can use it to find out information (such as image, flavor etc.) that are required to launch a new instance. Following shows an example:

image = nova.images.find(name="cirros-0.3.4-x86_64")
flavor = nova.flavors.find(name="m1.tiny")
network = nova.networks.find(label="mynet2")

Now you can use the client object to launch an new instance:

server = nova.servers.create(name = "myinstance4",
                                 image = image.id,
                                 flavor = flavor.id,
                                 nics = [{'net-id':network.id}],
                                 )


Google

User Profile
Kepler Lam
Canada

 
Links
 
Category
 
Archives
 
Visitors

You have 528365 hits.

 
Latest Comments